This document provides the admin with a step-by-step guide to create a Blob storage account, add it in the eSHARE Web Portal as a unique cloud storage per user and create a sharing policy for this Blob storage. In this use case, a unique container is automatically created per user and users have access to their own storage (like OneDrive). The following steps will be reviewed:
PREREQUISITES:
Utilizing Azure Storage Accounts as a cloud provider requires the “Azure Storage account” module subscription.
Access to the Microsoft Azure Portal to create the storage account.
An M365 administrator to create the mail-enabled security group in the Microsoft 365 admin center.
An eSHARE Organization Administrator to complete the steps in the 'Admin Console'.
Create a Storage Account
Log in to the Microsoft Azure Portal (For Commercial Customers: https://portal.azure.com | For Government Customers: https://portal.azure.us).
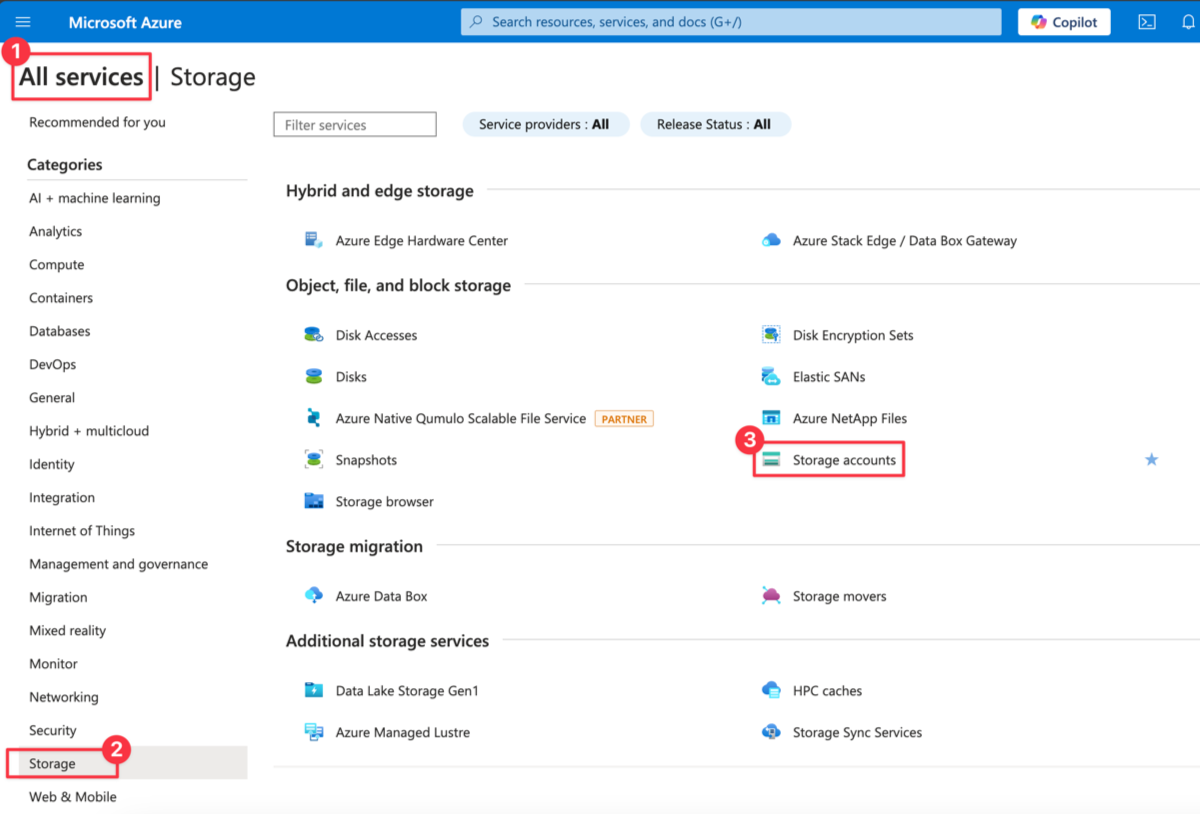
Select 'All Services' > 'Storage' > 'Storage Accounts'.
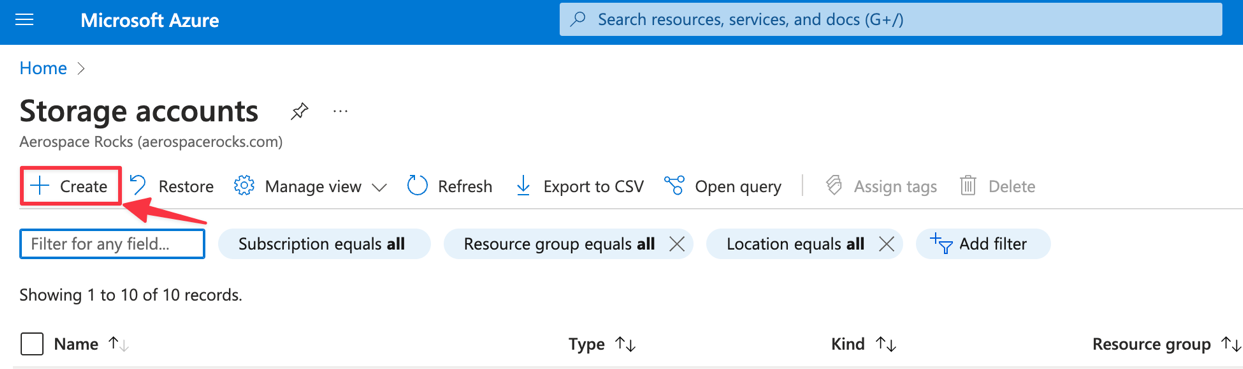
In the Storage Accounts menu, select the '+ Create' button to create a new storage account.
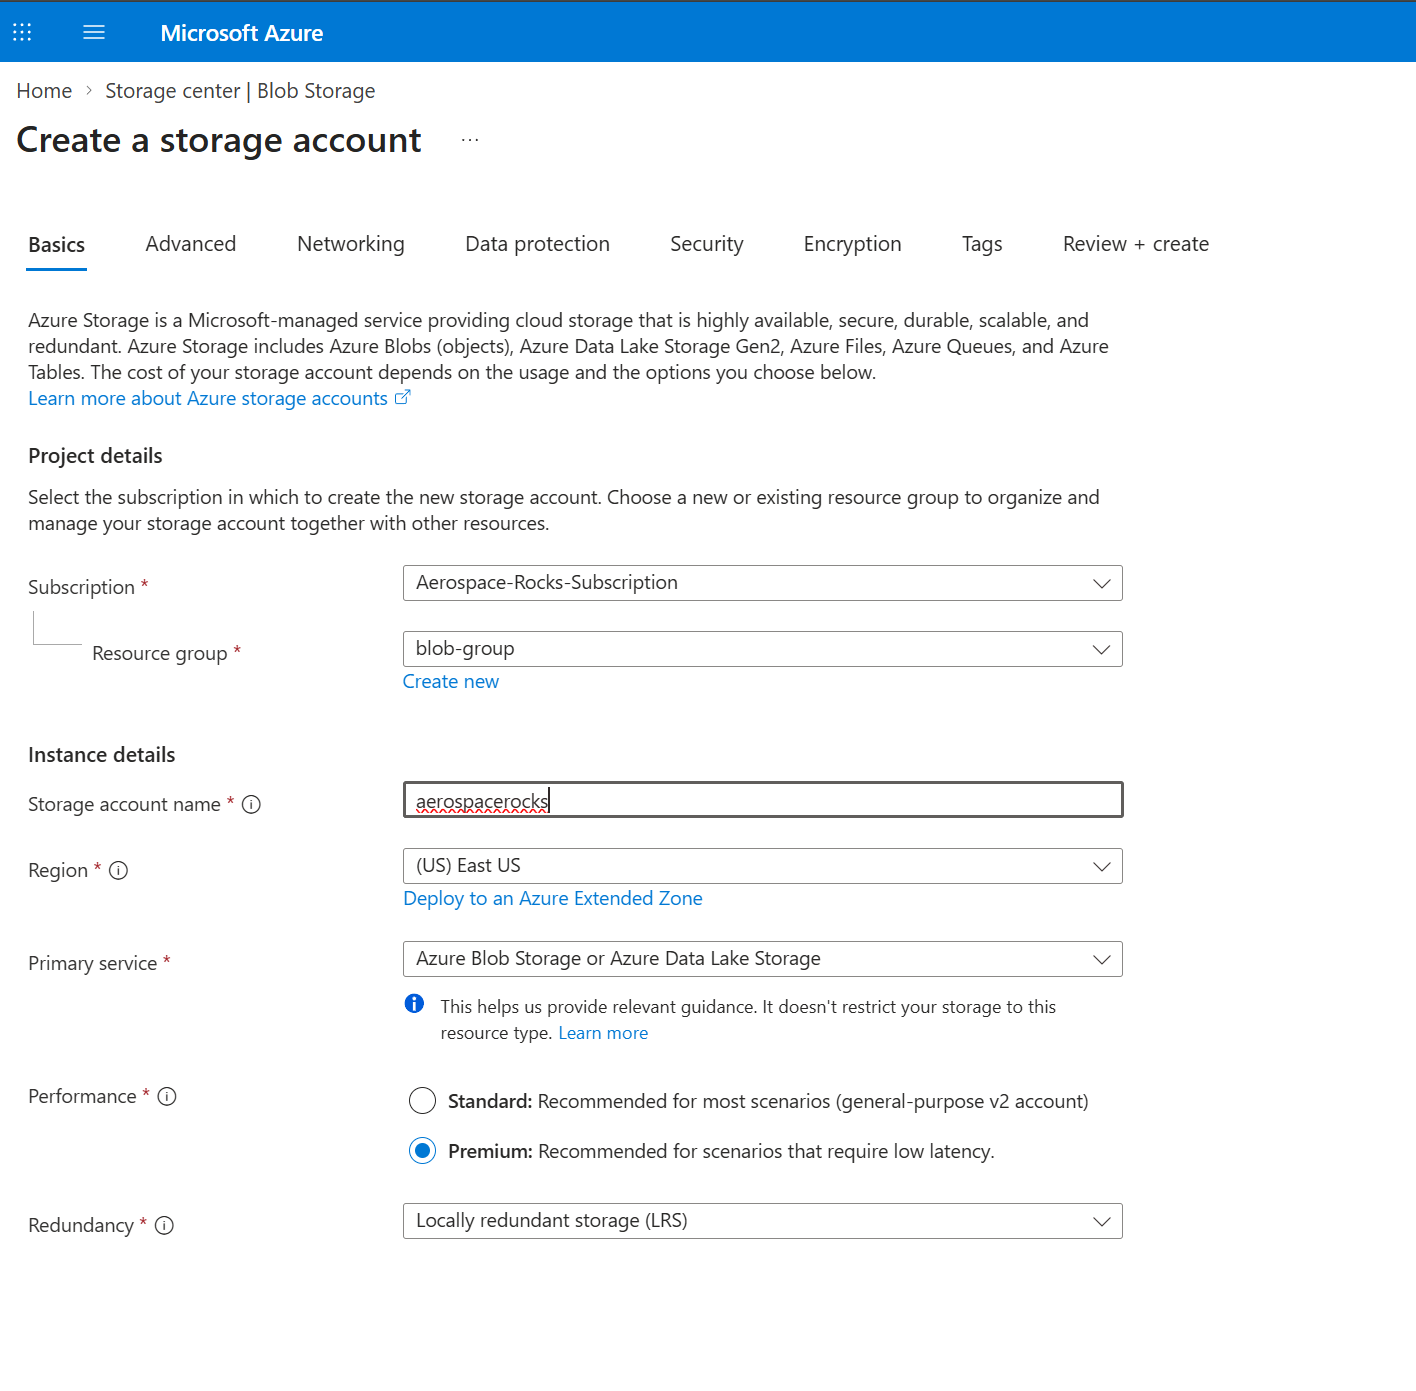
Fill in the necessary details such as:
Subscription
Resource Group
Storage account name (The name must be unique across Azure, 3-24 characters long, and include only numbers and lowercase letters)
Region (eShare service is hosted in EastUS)
Primary Service: Azure Blob storage or Azure data lake storage
Performance (Premium is preferred but Standard is supported)
Premium account type (only Block blobs are supported, *Will only appear if supported)
Redundancy (up to the Organization)
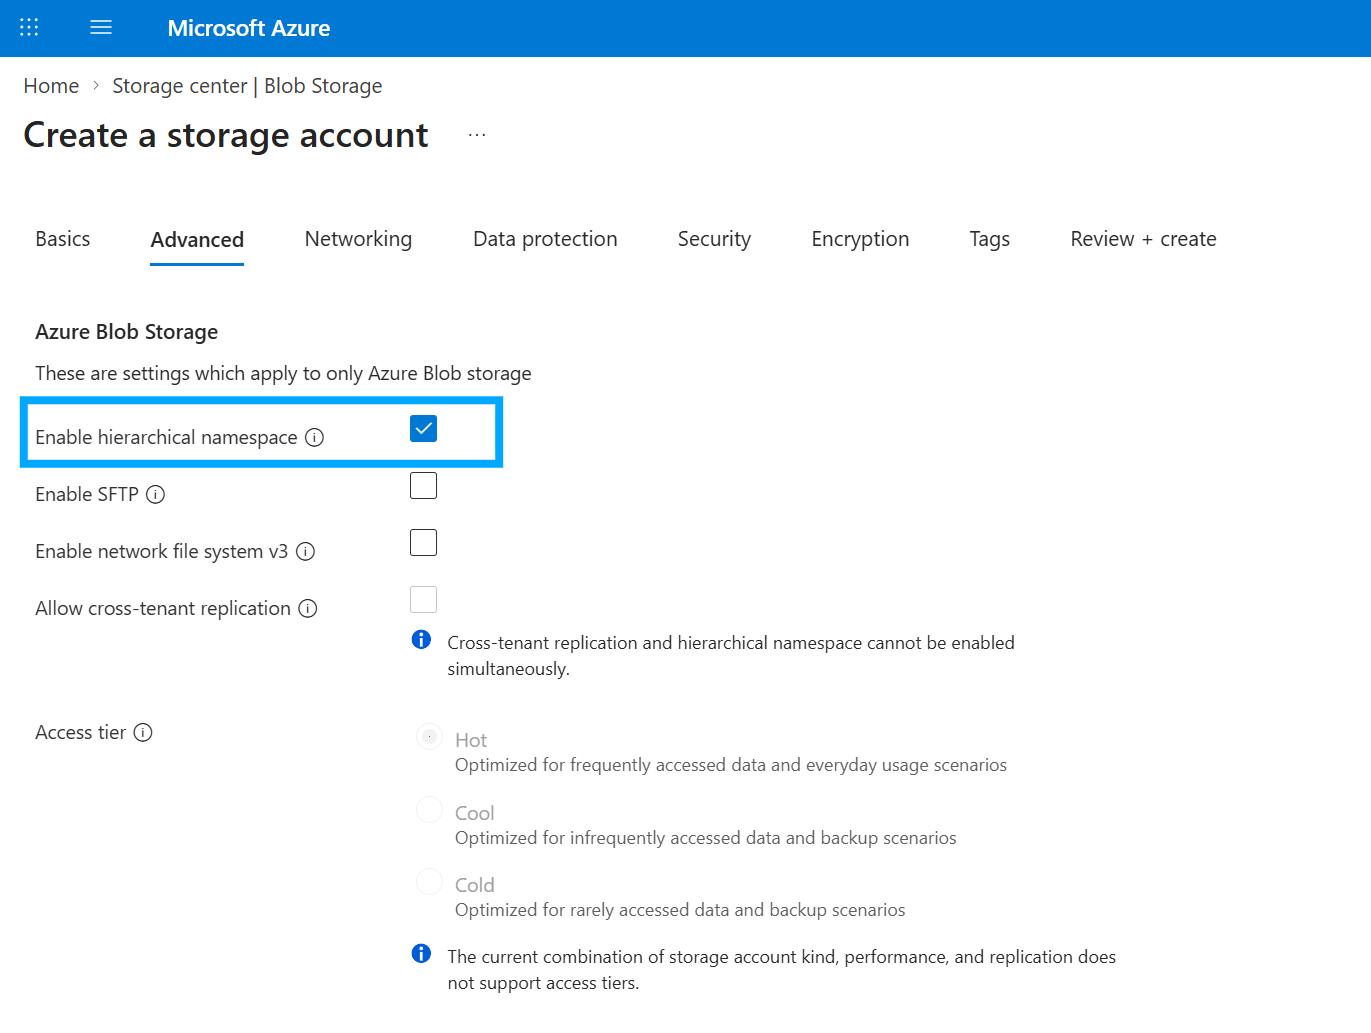
Under the 'Advanced' section, make sure to check the box that says 'Enable Hierarchical namespace'.
No changes are required for the 'Data Protection' and 'Encryption' sections, however you are welcome to adjust these options to what fits your organization.
For Network Connectivity, it is recommended to utilize the 'Enable from selected IP addresses' or 'Disable public access and use private access' options. Whichever is chosen, please inform your eShare Customer Service Manager and they will initiate the private link or provide the eShare service IP addresses.
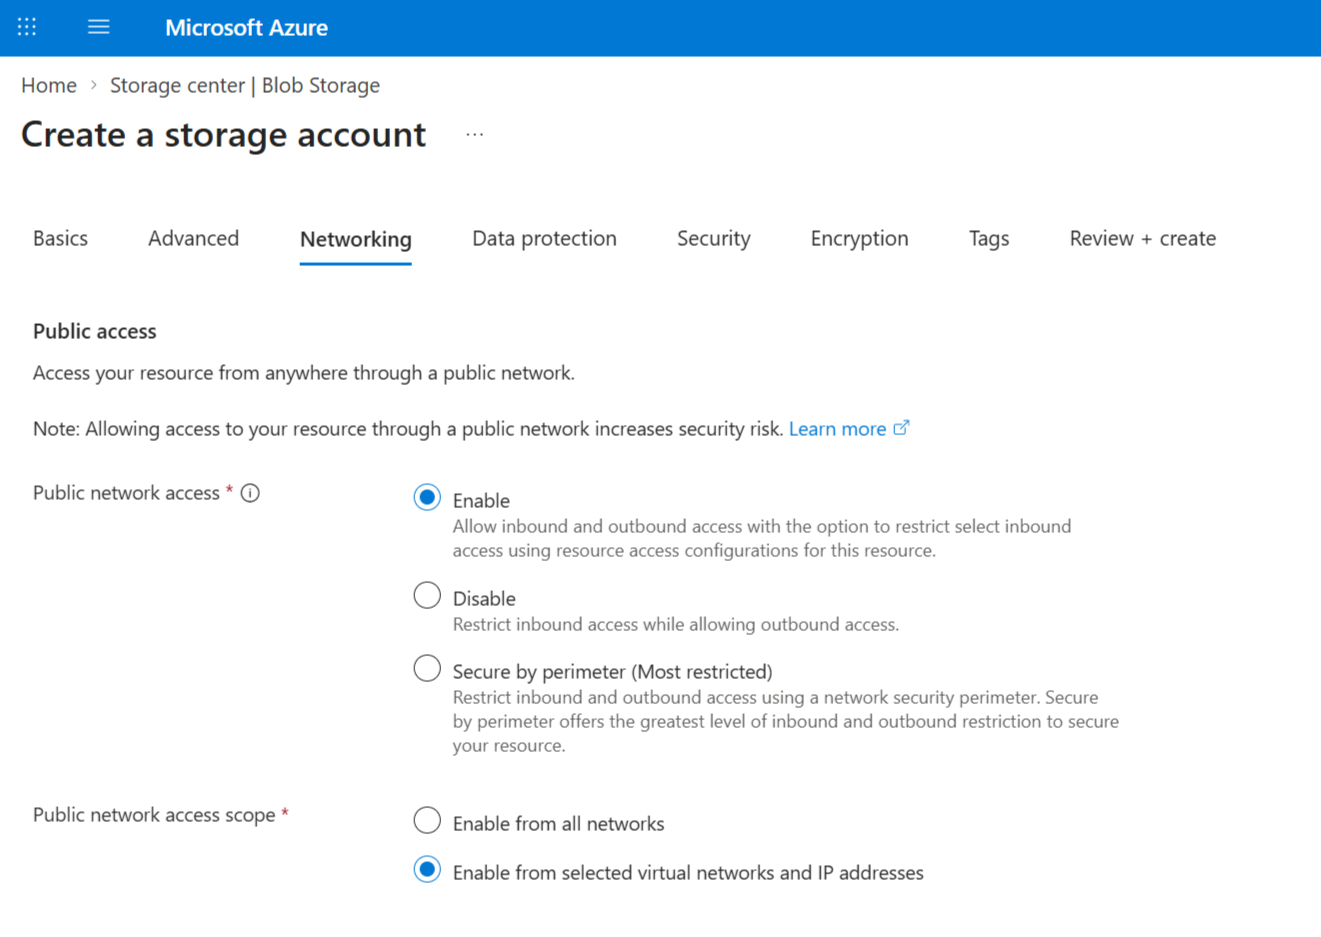
After settings are selected, proceed to 'Review + Create' to provision the storage account. It will take a few minutes for it to be created.
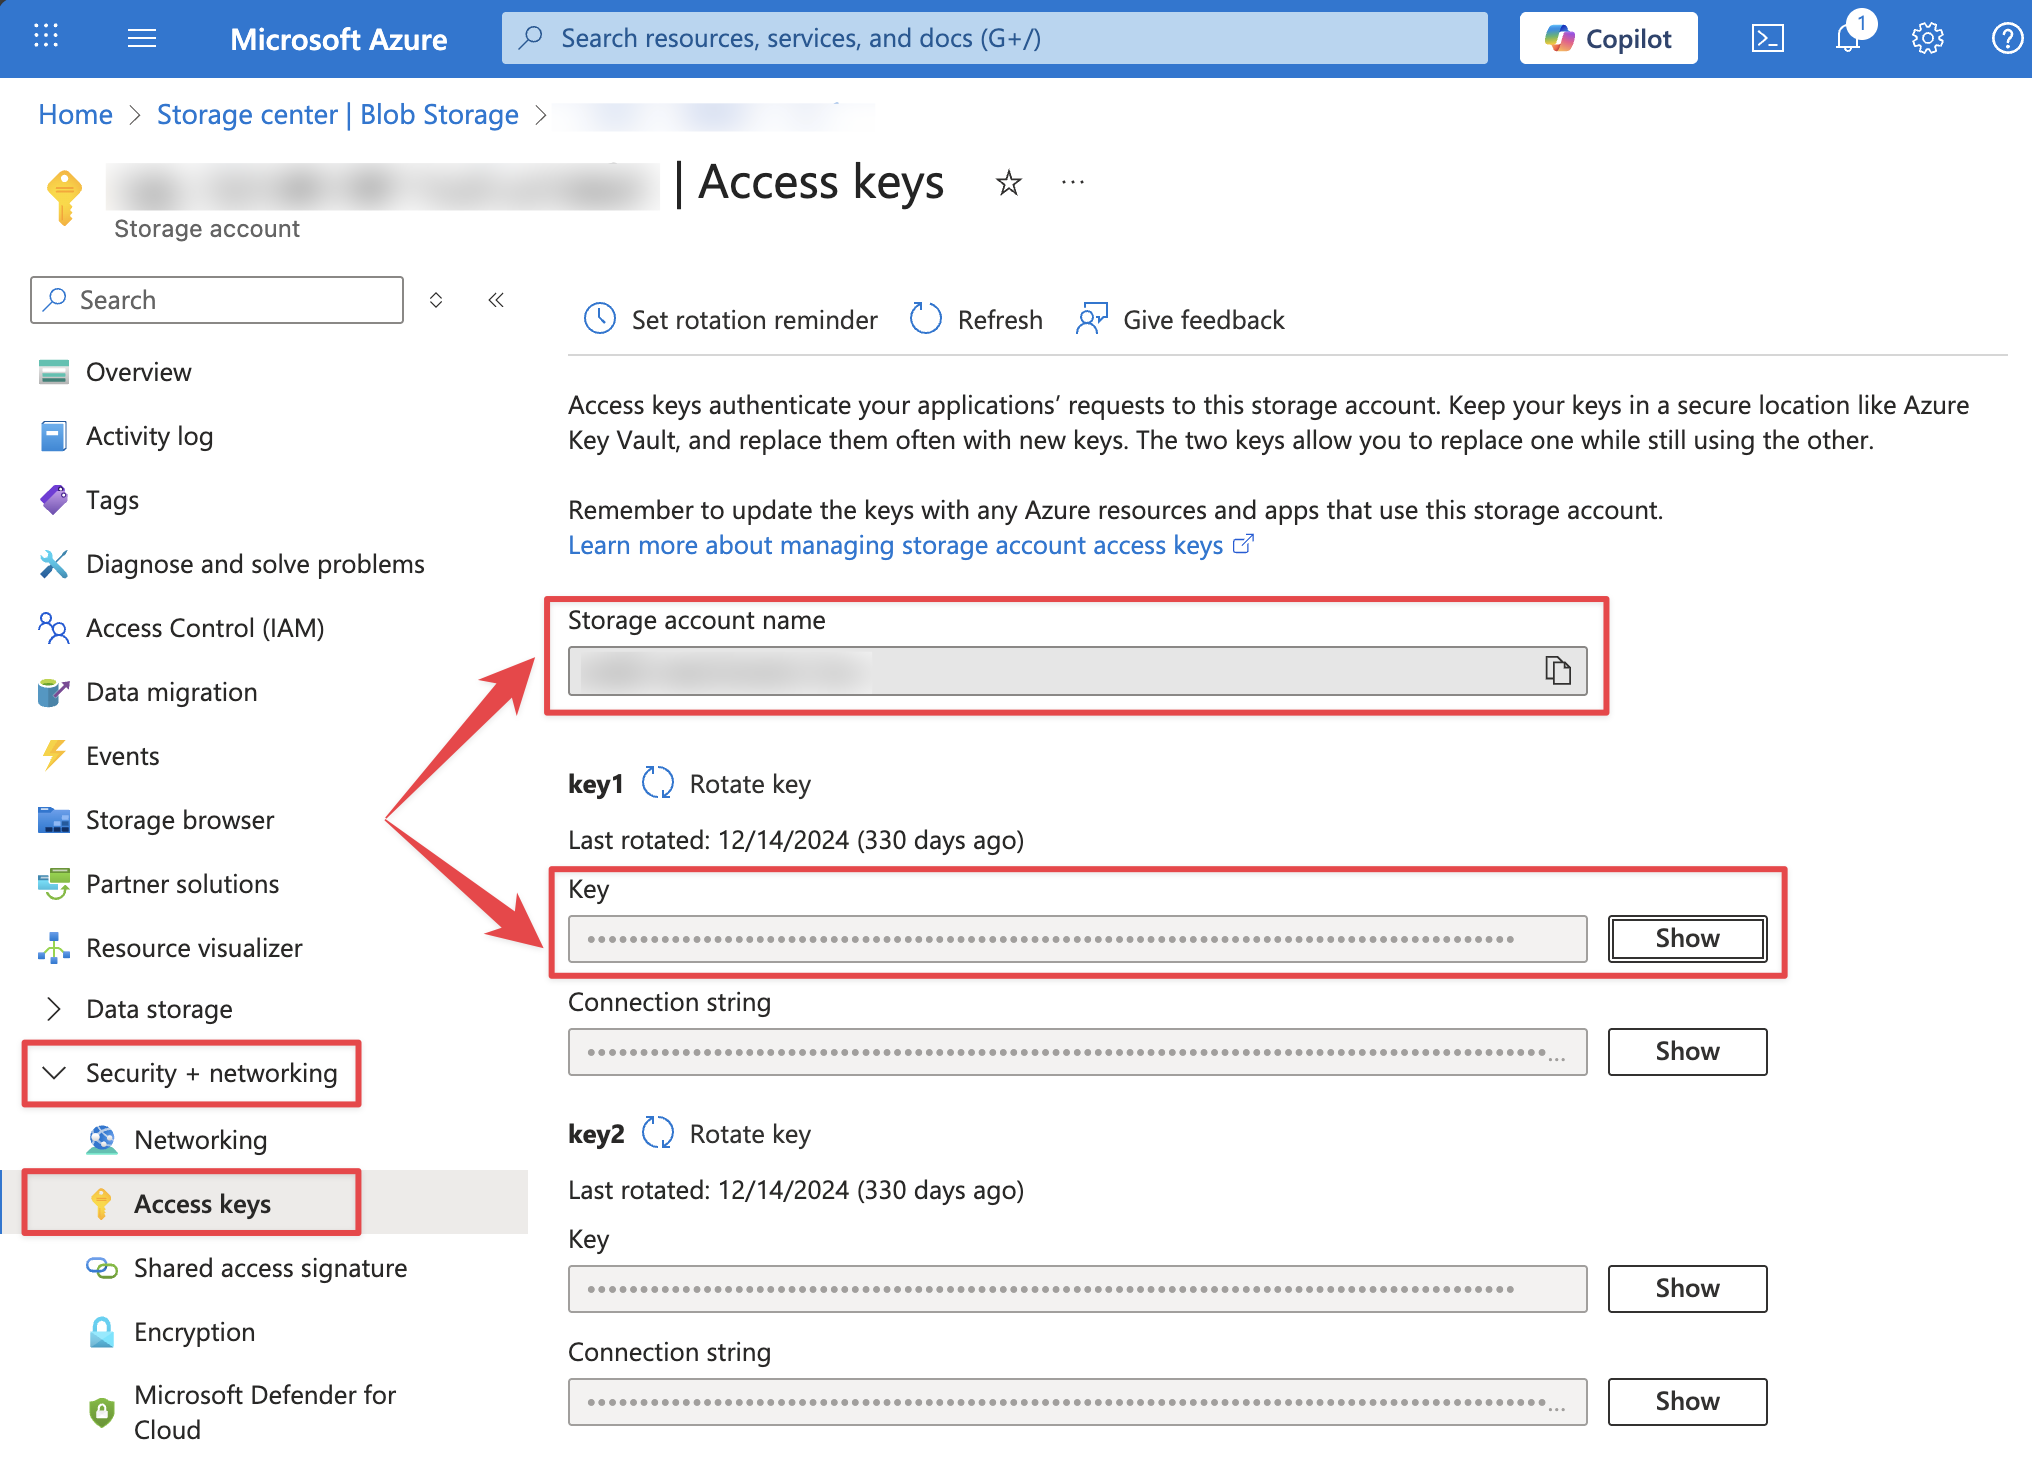
Once the storage account is provisioned, find the 'Security + networking' menu and select 'Access Keys'. Copy the Storage Account Name and Account key; these will be added to the eSHARE Web Portal later.
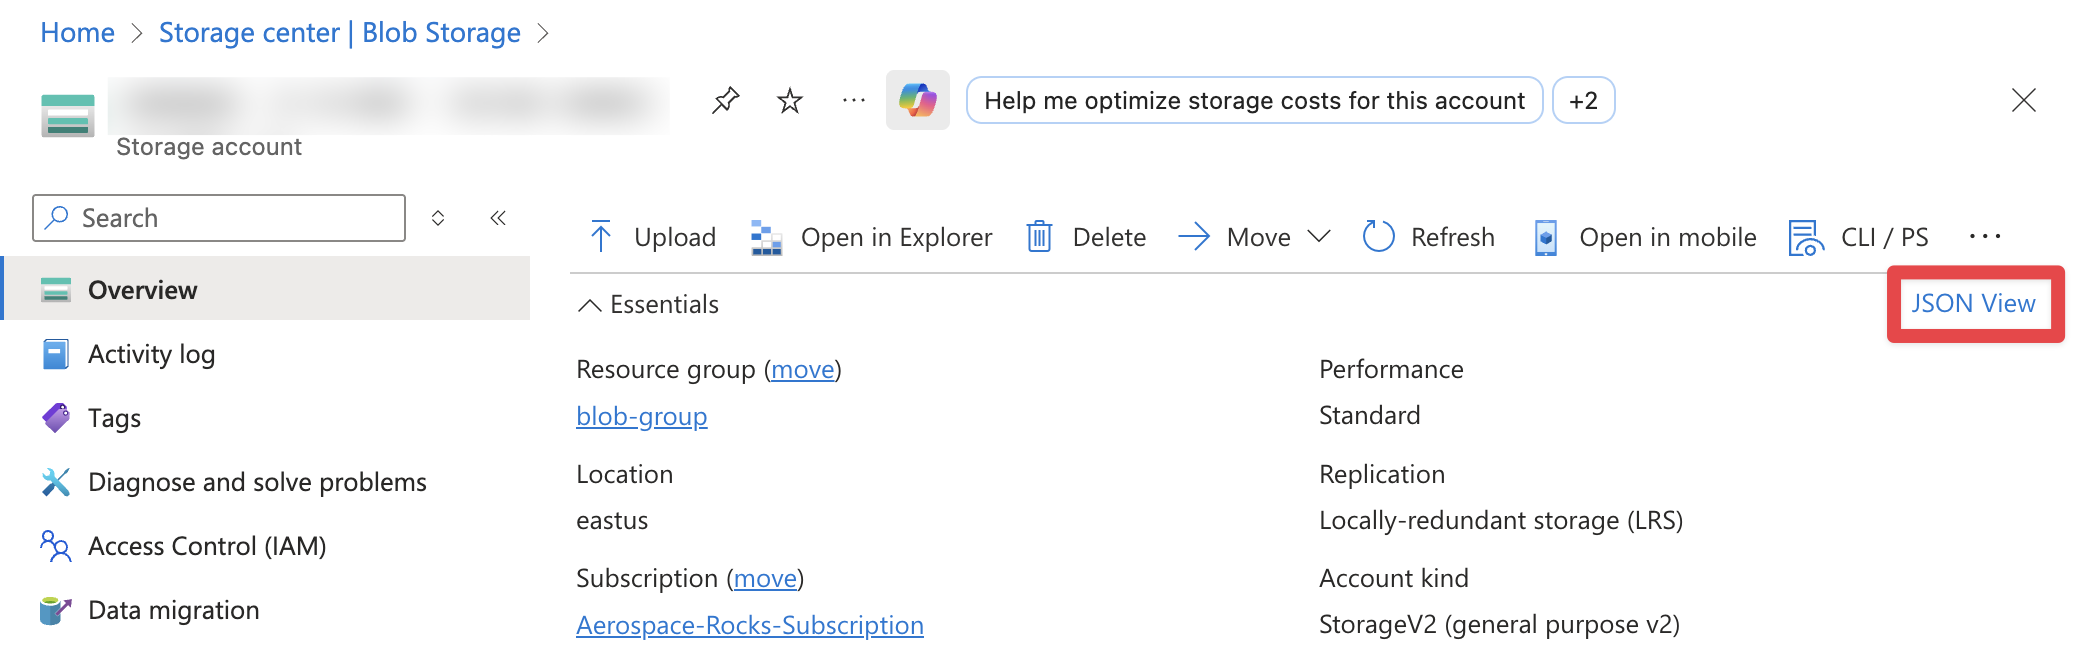
Once creation has completed, navigate to the Storage Account resource, go to the 'Overview' page, select 'JSON View', and send the Resource ID to your eShare Customer Success Manager so they can initiate the Private Endpoint Connection.
Approve Private Endpoint Connection
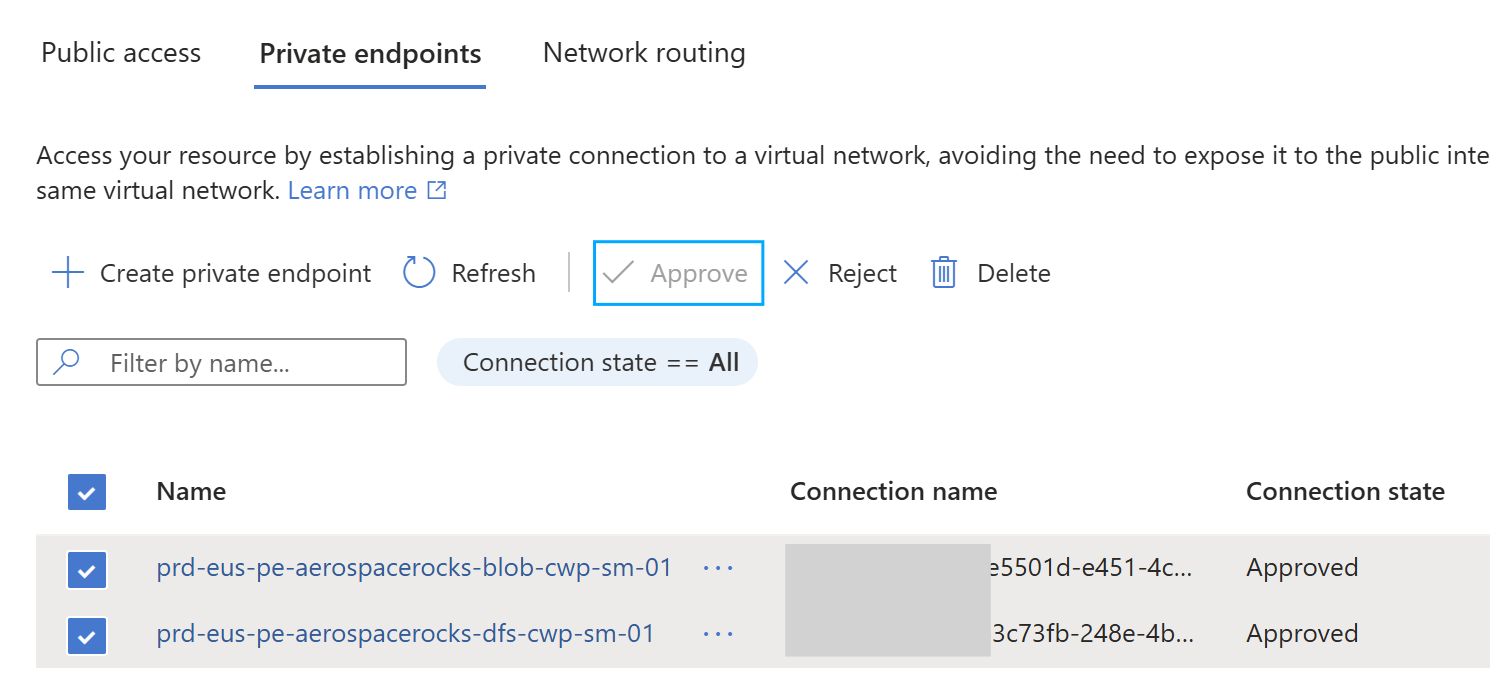
In the newly created storage account, navigate to the 'Security' section and select 'Networking'.
Select the 'Private Access' tab. Under 'Private endpoint connections' there will be two pending requests; review the requests and approve them.
Create a Mail-Enabled Security Group
As an M365 administrator, in the admin center (https://admin.cloud.microsoft or https://portal.office365.us/adminportal), navigate to 'Teams & Groups' > 'Active teams & groups' > 'Security Groups' > 'Add mail-enabled security group'.
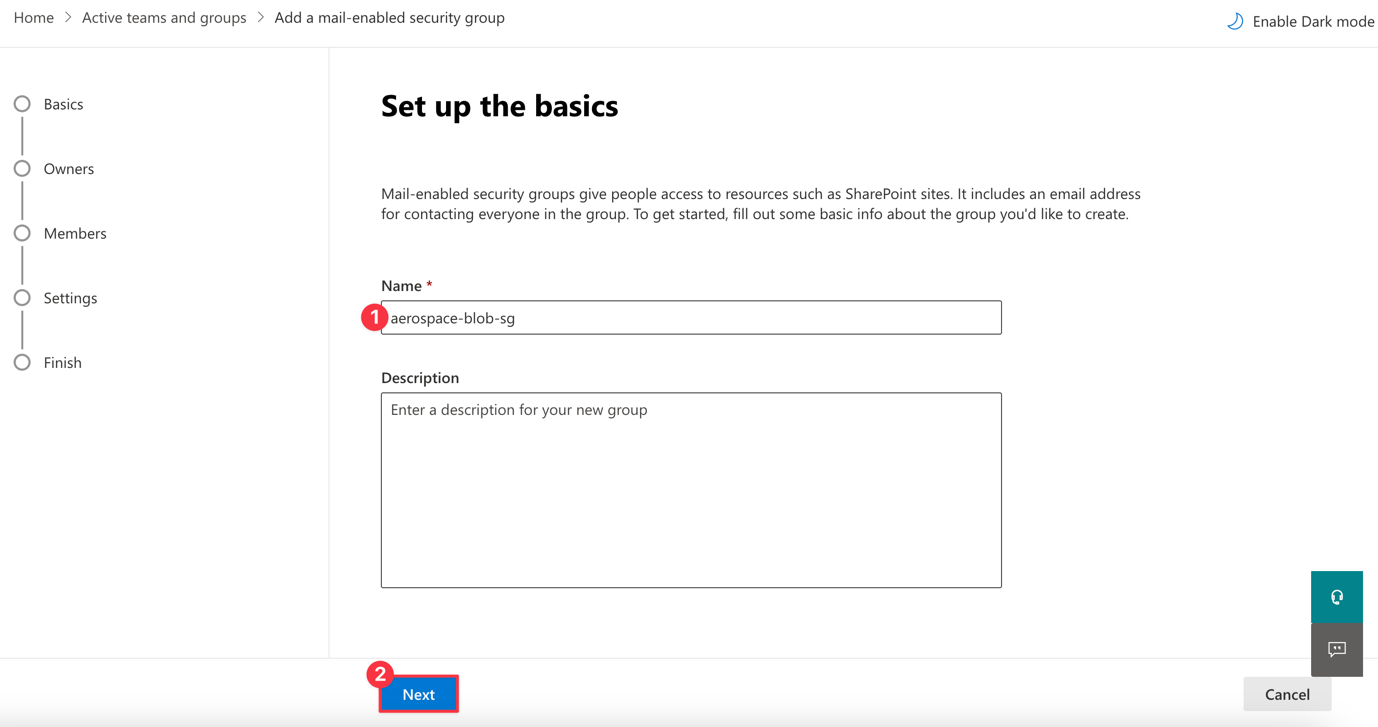
Type the name of the Mail-enabled Security group and select 'Next'.
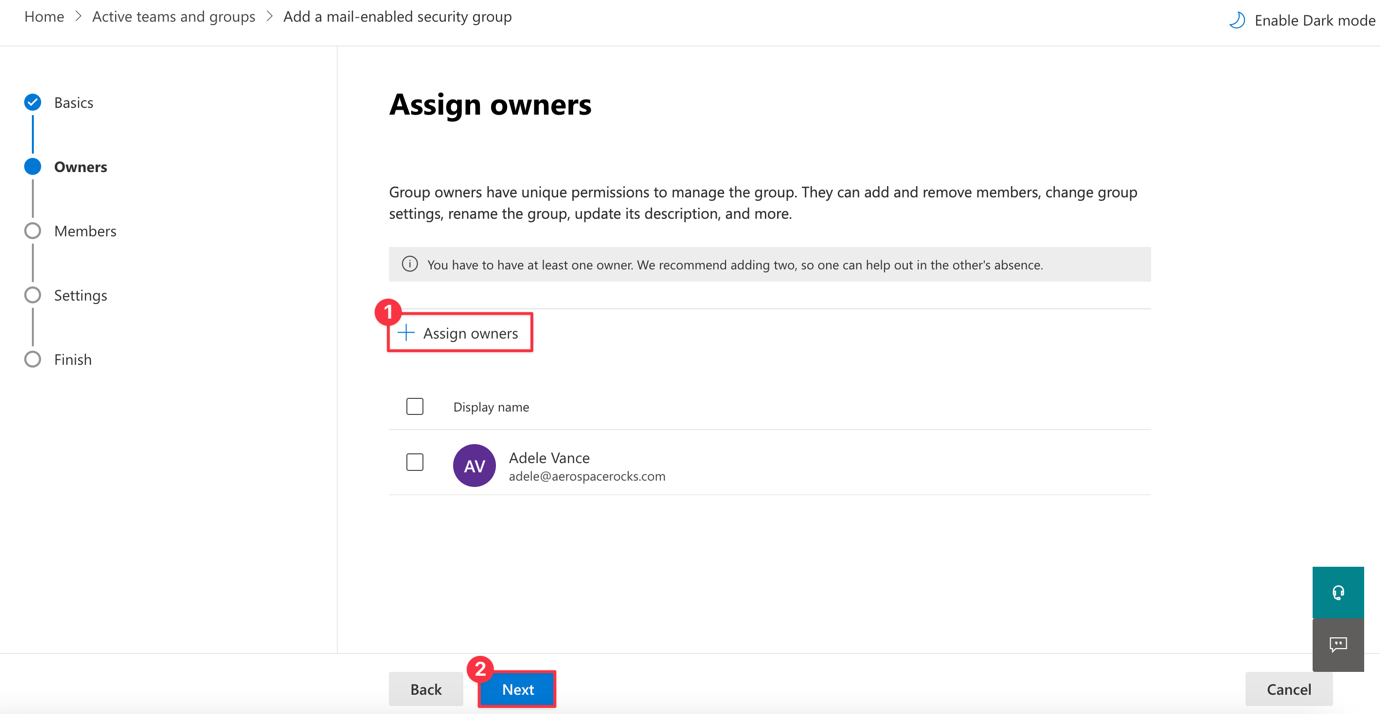
Assign the owners to manage the group and then select 'Next'.
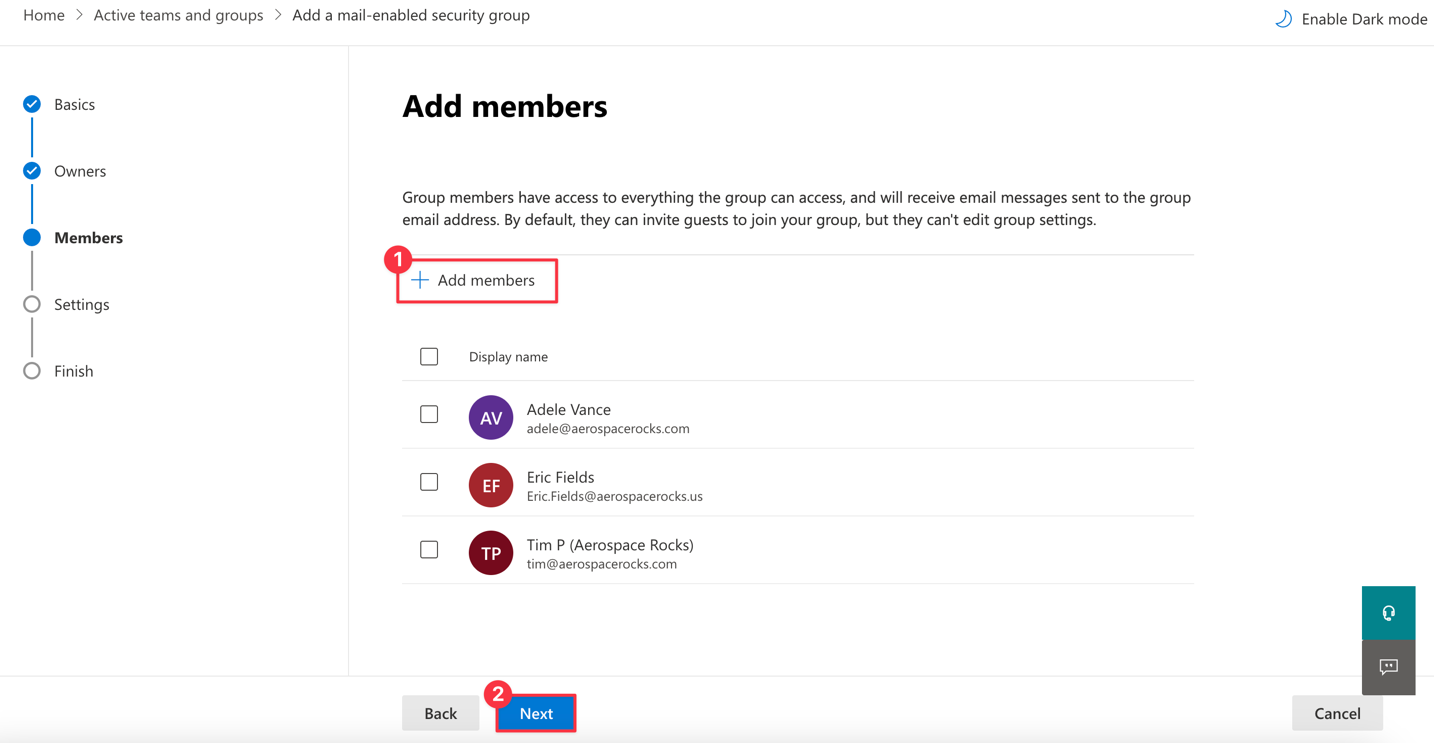
Add members that can access the group and select 'Next'.
Note:
If a user is an owner but not a member, they will not be able to access blob as a cloud provider. Make sure the user is also a member to access the blob storage.
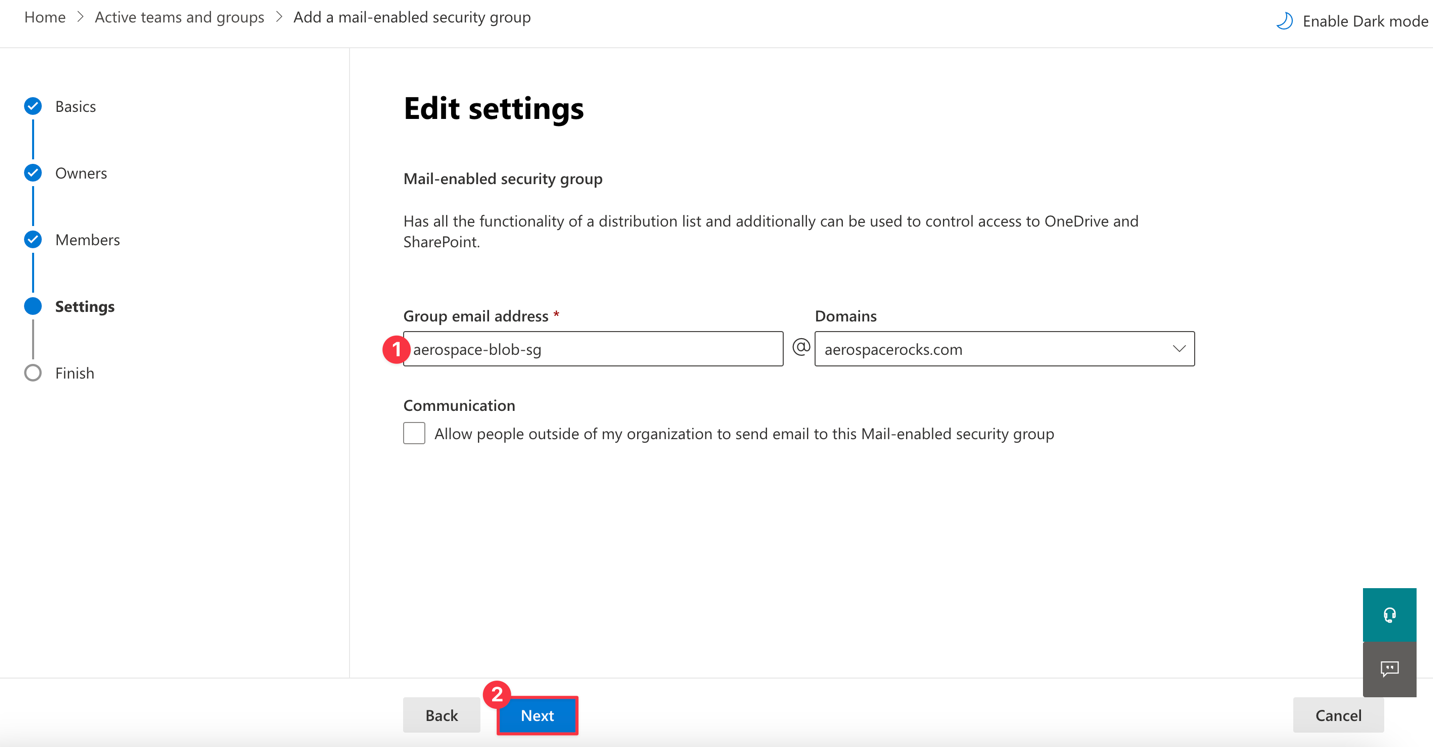
Create a group email address that will be referenced when adding the group to eShare, and then select 'Next' to proceed.
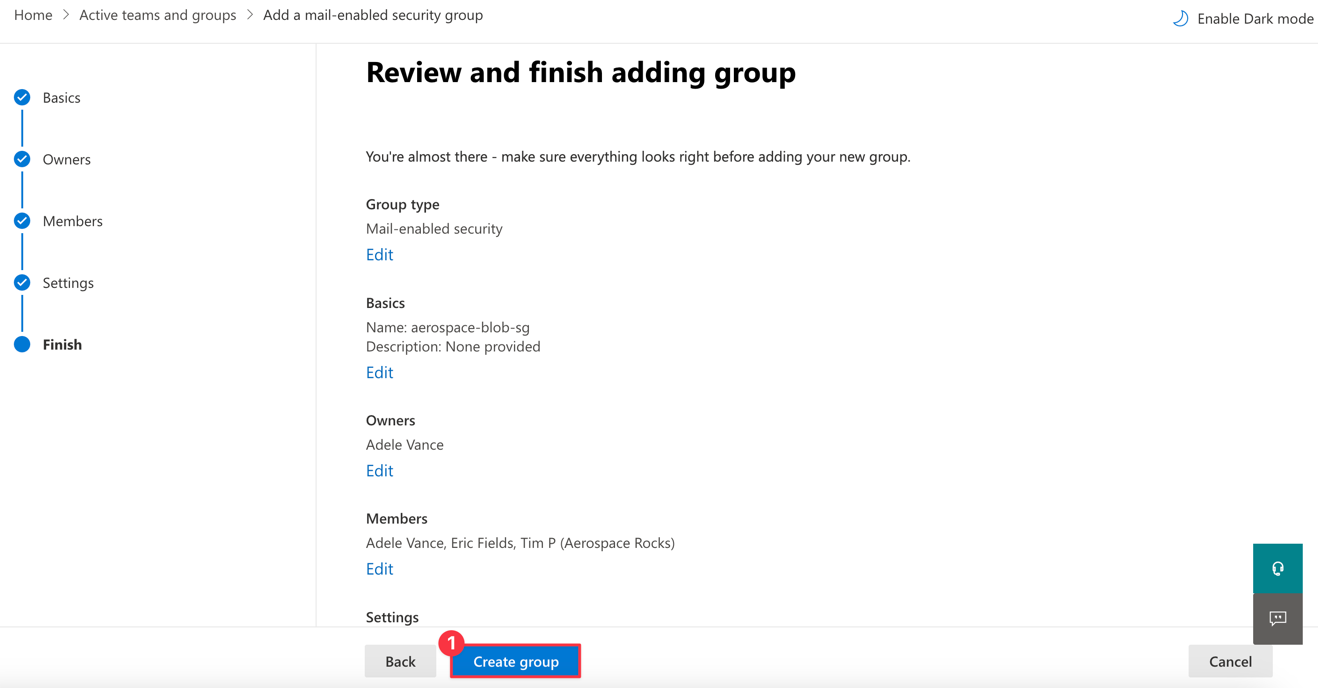
Review the final settings and membership, then finalize and select 'Create group'.
Create a Sharing Policy for Azure Storage Account Use
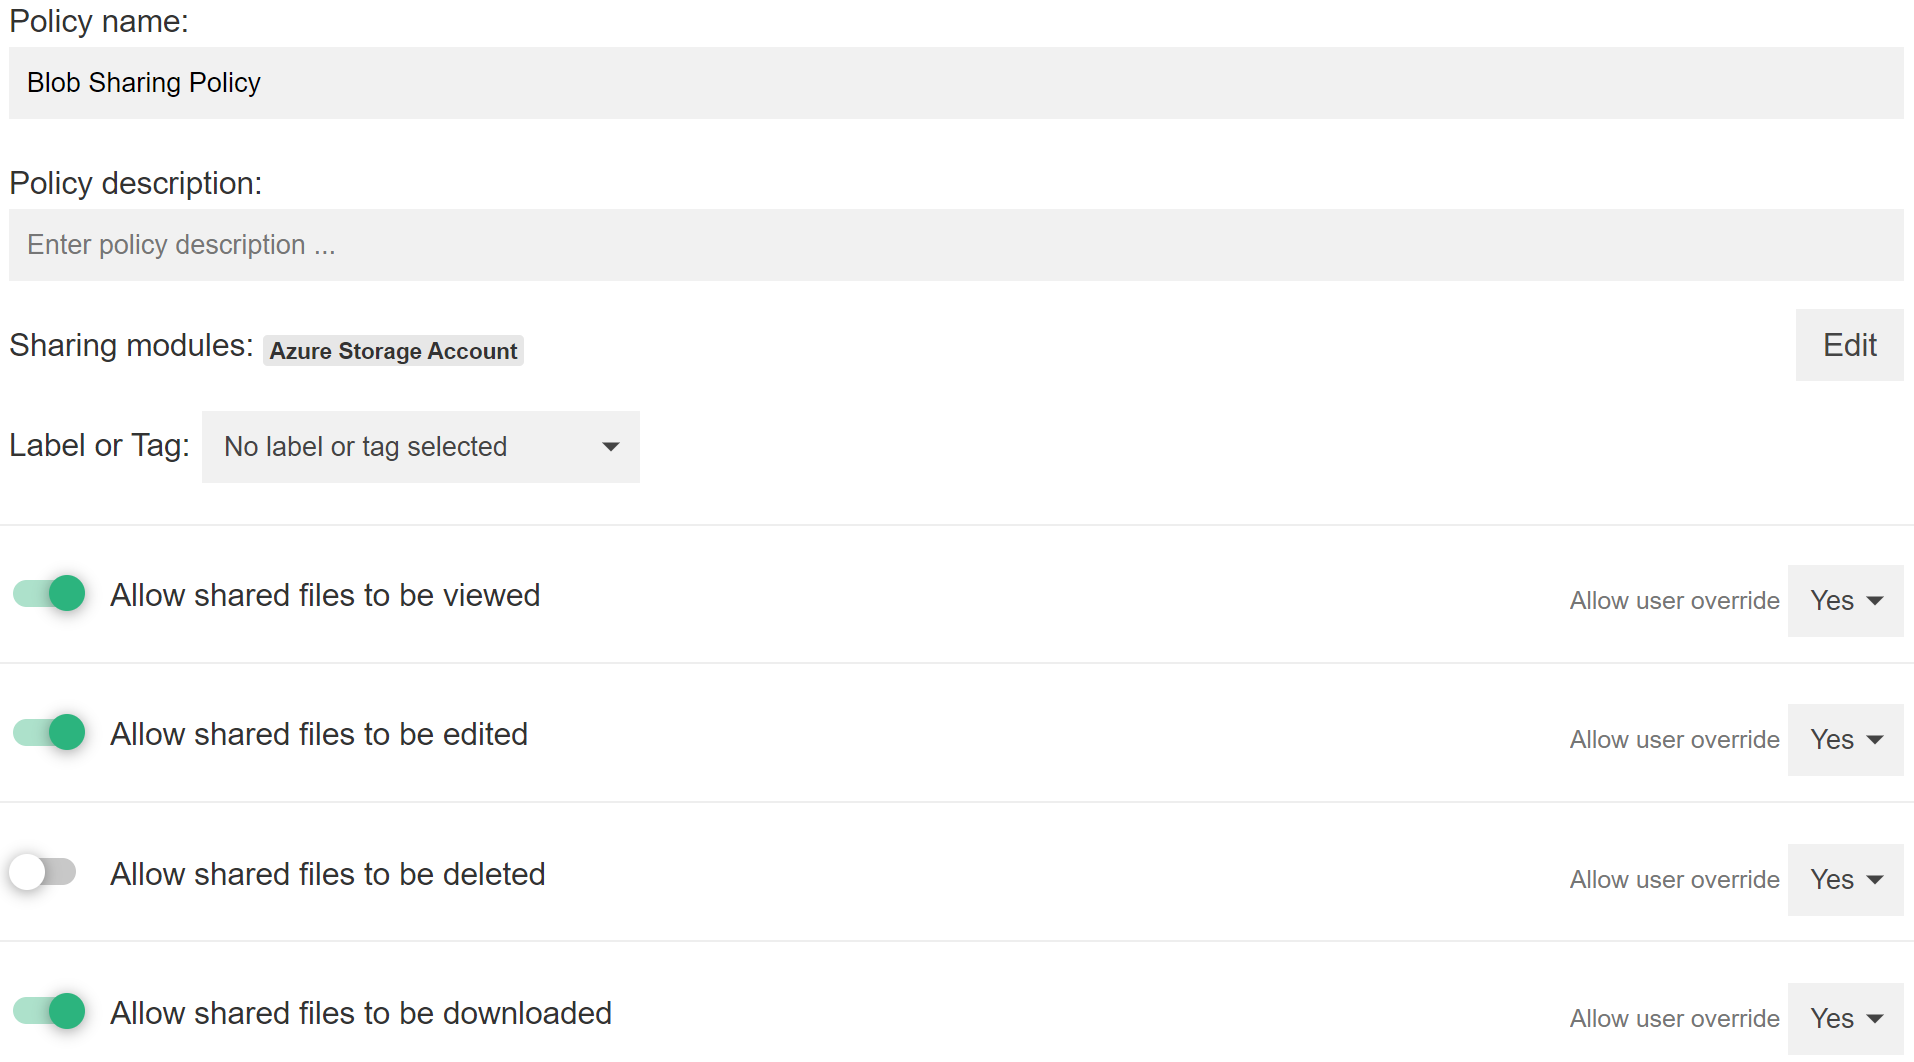
The organization’s administrator will need to set a sharing policy that will be used with the new endpoint. They can set the options they would like to use for the Trusted Share (ex. download, view, login required, expiration). An Azure icon denotes that this policy will be used as the blob policy.

When creating the policy, there are no immediate limitations on permissions that can be applied; just ensure the 'Azure Storage Account' module is assigned to the Sharing Policy.
Enable a Group for Access to the Storage Account
As an Organization Administrator, log in to the eSHARE Web Portal.
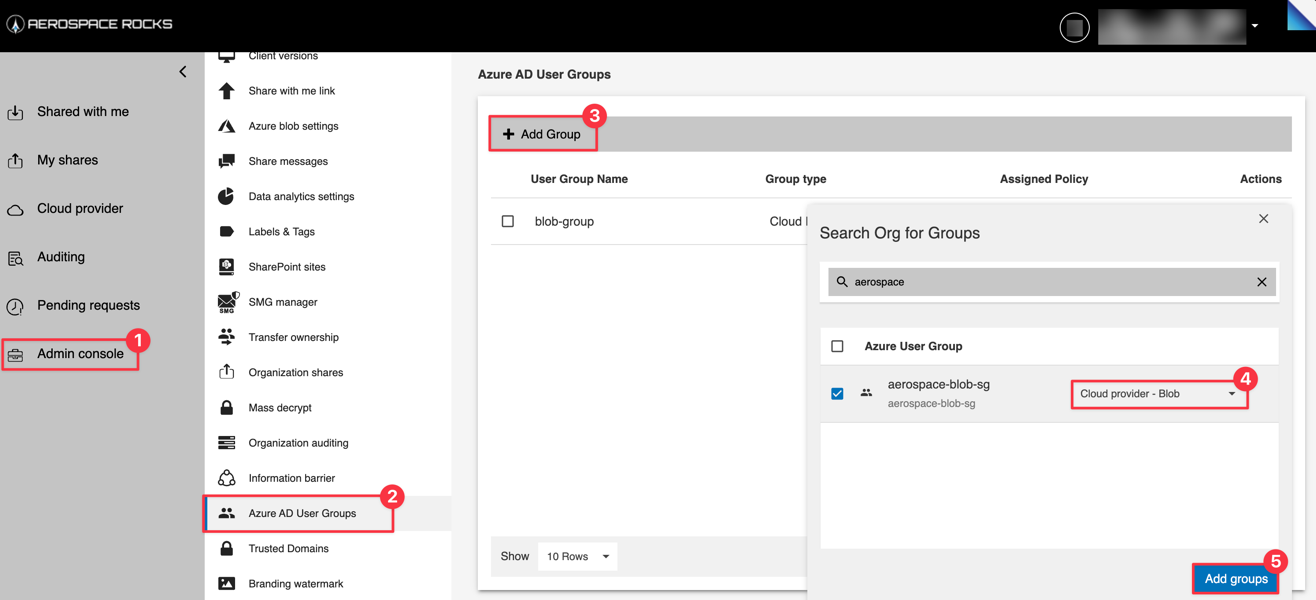
Navigate to 'Admin Console' > 'Azure AD User Group' and select '+ Add Group'.
In 'Search Org for Groups', type the name of the group, select 'Cloud Provider – Blob' and then select 'Add groups'.
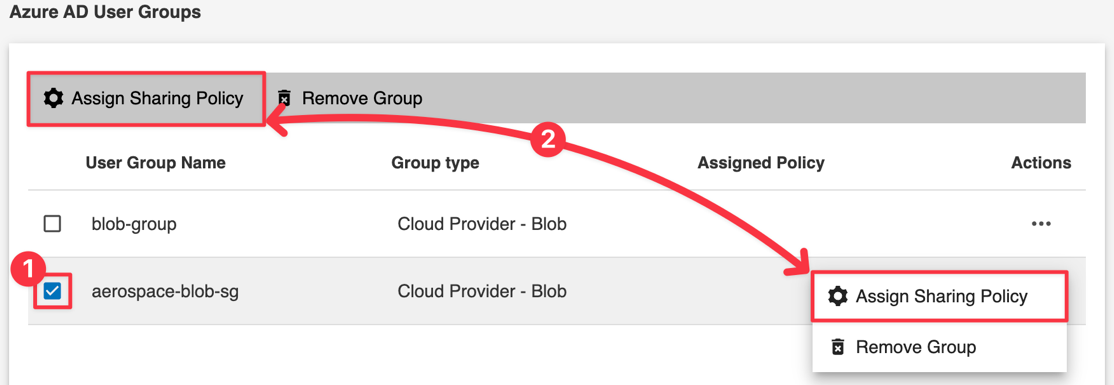
Select the newly added group, select the 3-dot menu for 'Actions', and select 'Assign Sharing Policy'.
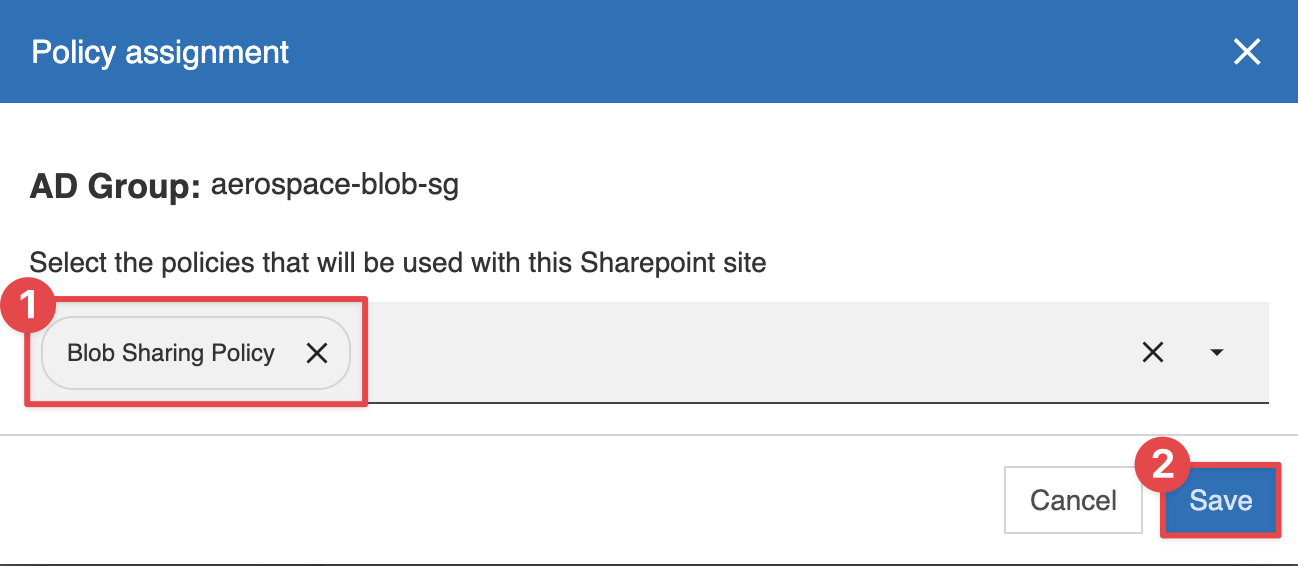
Select the 'Blob Sharing Policy' and select 'Save' to finalize the selection.
Add the Storage Account to the eSHARE Admin Console
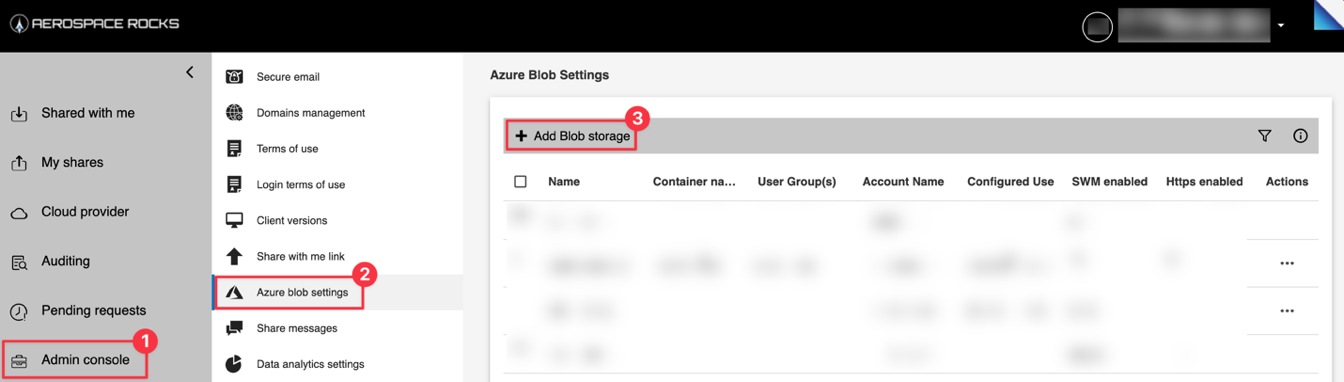
In the eSHARE Web Portal, navigate to 'Admin Console' > 'Azure blob settings' and select 'Add Blob Storage'.
Note:
If the created blob is hosted in AzureGov, for step 2c) please ensure you append ;EndpointSuffix=core.usgovcloudapi.net to the end of the account key string.
Enter the following information for the created Storage account:
Name - The name the storage account will have in eShare.
Account name - The name you assigned to your Blob storage during its creation in Azure.
Account key - Required for the Blob Storage, is located in Azure under 'Security + networking' > 'Access Keys'.
Please make sure to leave the container name empty.
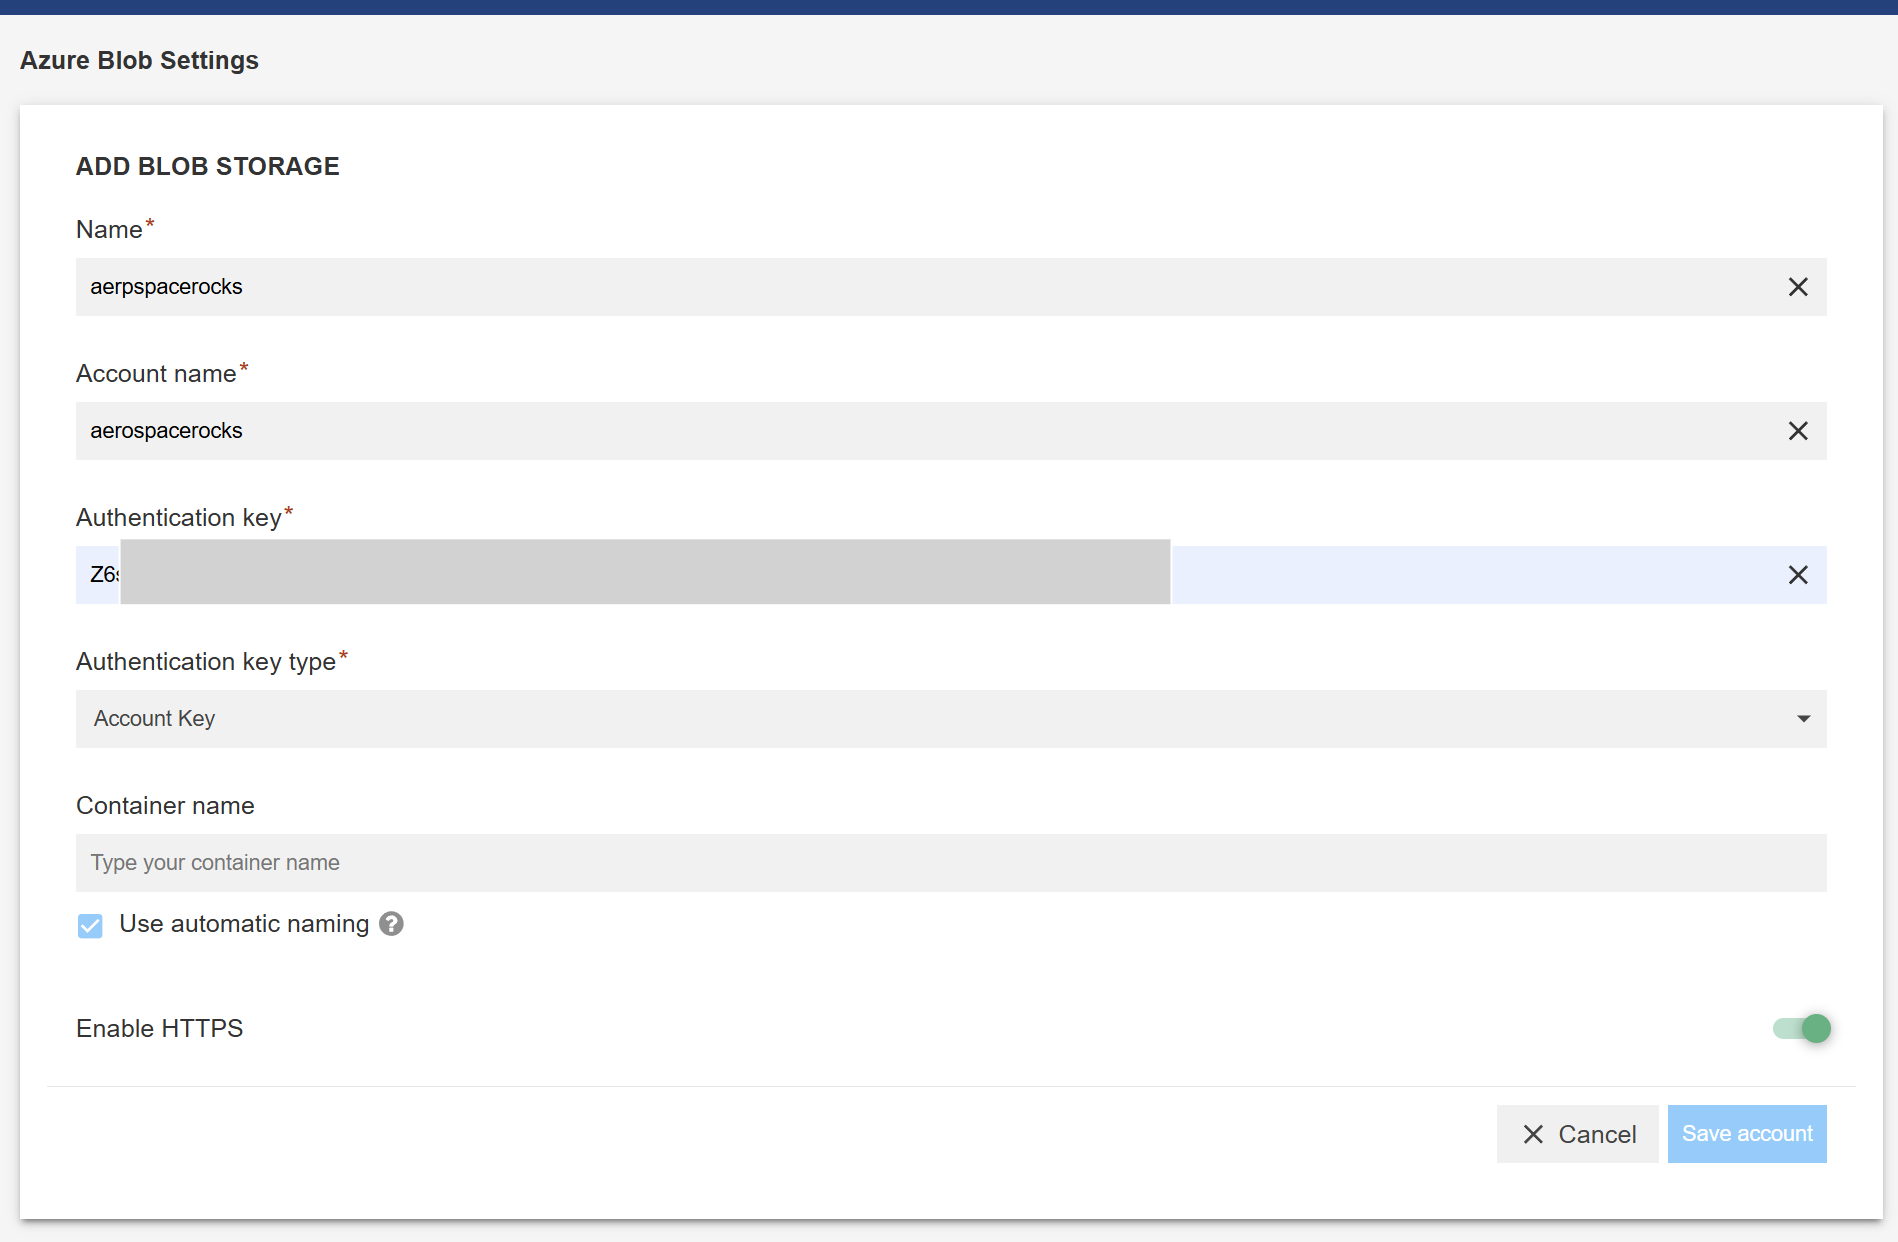
Once all the fields are populated and verified, select 'Save account'. The new blob storage should appear in the list and be ready for use. If you do not see it immediately, reload the page.
Activate the Storage Account as a Cloud Provider
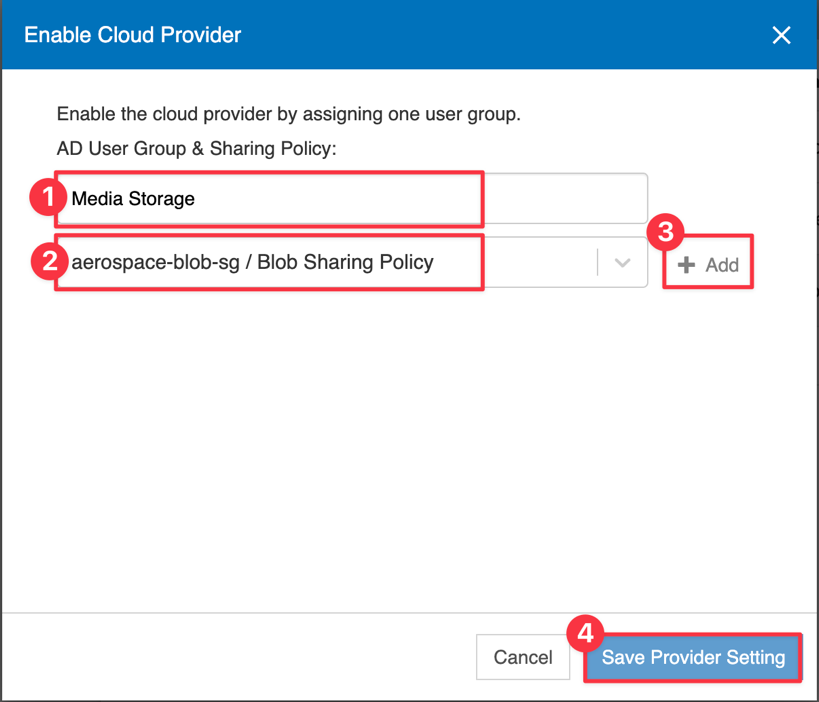
To add the Blob storage as a Cloud provider, go to 'Azure blob settings', select the Blob Storage account, and select 'Enable Cloud Provider'.
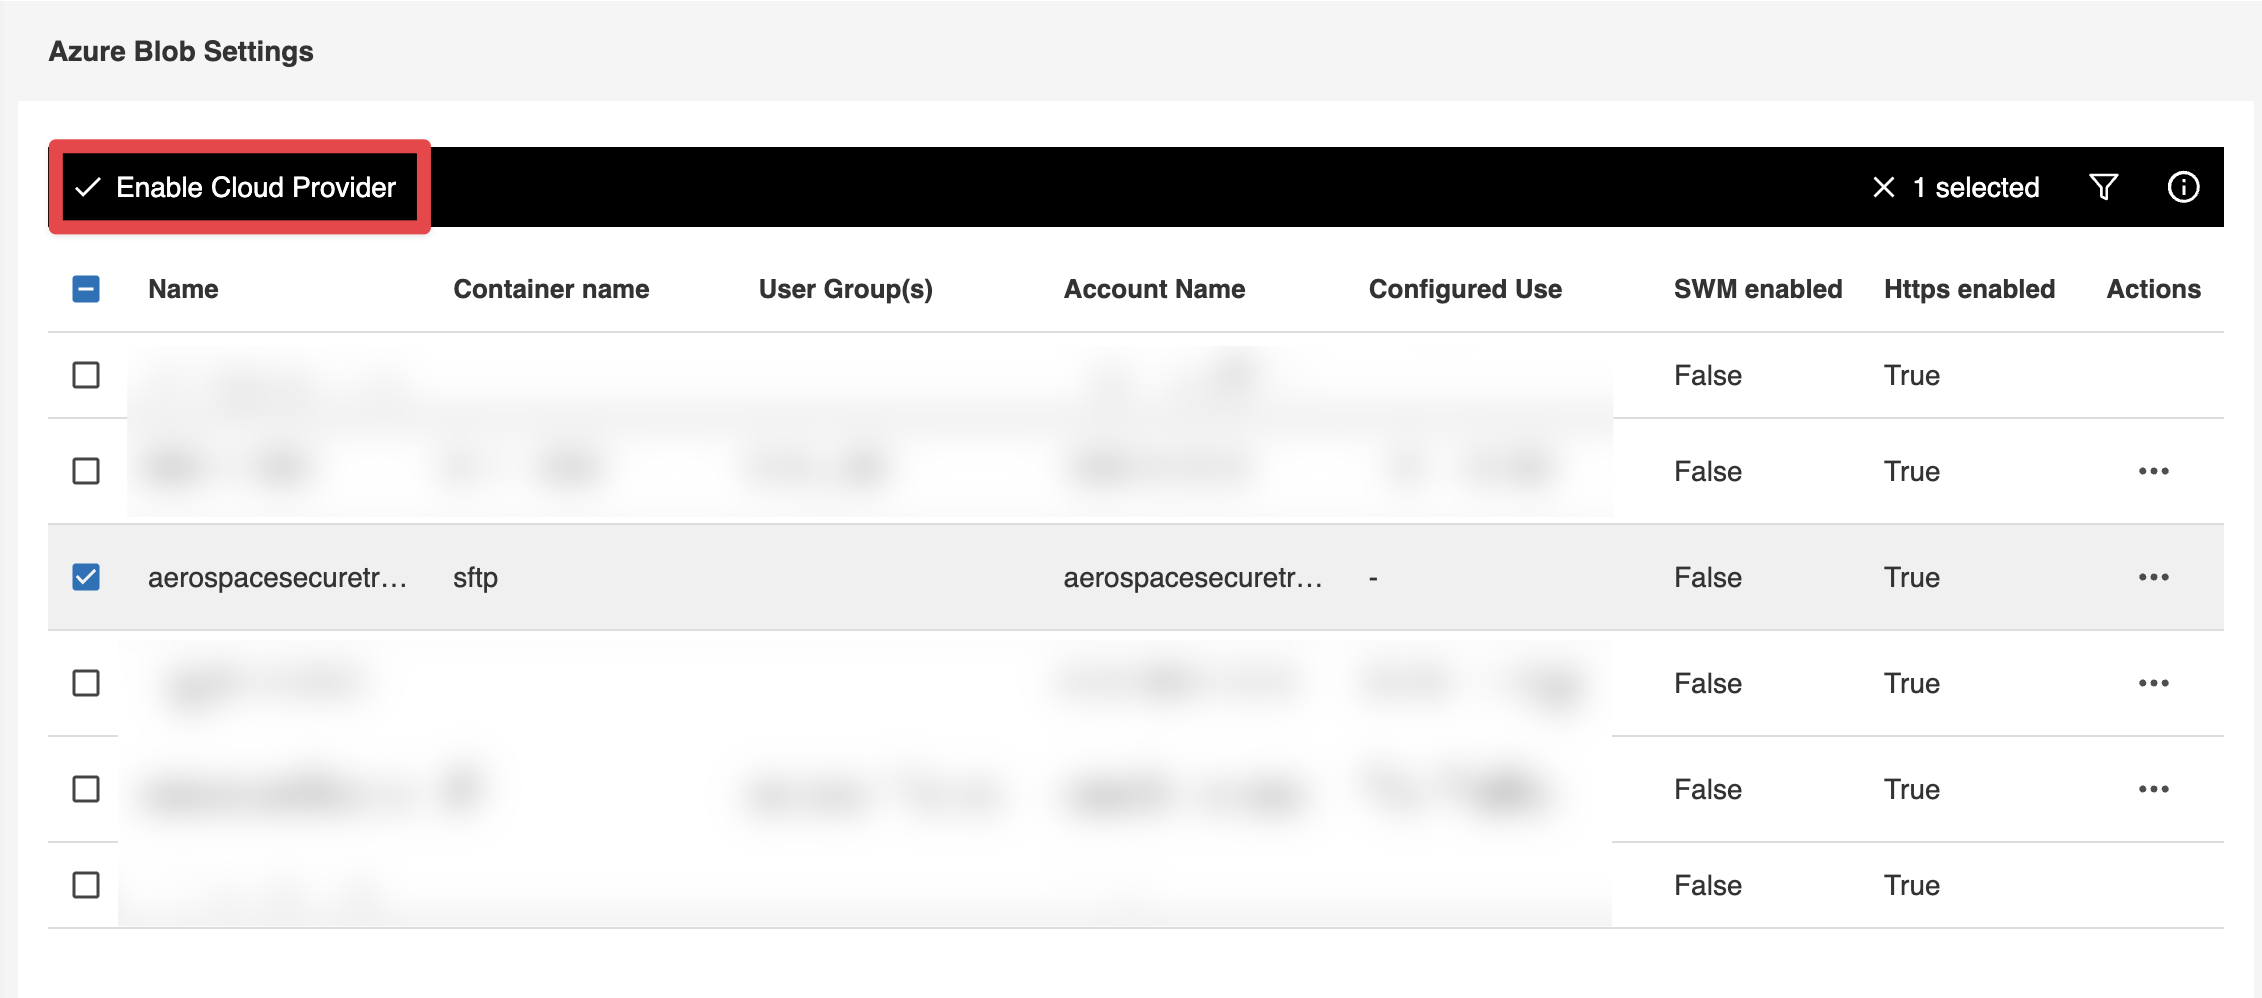
Within the 'Enable Cloud Provider' page, enter a display name for the Blob provider which will be shown on the Cloud Providers page, select an assigned Group / Policy pair, then select '+ Add'.
After the Blob is activated, users who are a part of the mail-enabled security group will see the storage as a Cloud Provider upon next login. Users will only be able to see the Blob Storage from the 'Cloud Provider' page within the eSHARE Web Portal. This storage is unique for each user. At the same time, a unique container is created in the storage account. You can verify it under your storage account's 'Data Containers'.