This document describes the steps to create a custom eSHARE Collaborate application in the Microsoft Entra (Azure AD) portal. The following steps will be reviewed:
PREREQUISITES:
The person performing these steps must have an administrator role assignment of Application Administrator, Cloud Application Administrator, or Global Administrator in the destination M365 tenant.
Caution:
While the Sites.Selected implementation exists, eSHARE DOES NOT recommend using this approach as it goes against best practices and creates significant administrative overhead for organizations who use it.
Register the Application
Sign in to the Microsoft Entra admin center (https://entra.microsoft.com or https://entra.microsoft.us) and navigate to 'Applications' > 'App Registrations'.
On the 'App Registrations' page, click the '+ New registration' button in the top menu bar.
Enter a recognizable, unique name for the custom eSHARE app and select the 'Register' button at the bottom of the page. In a few moments, a shell application is created and ready for further configuration.
Modify the Application Manifest - Commercial Cloud
Note:
If any of the manifest lines do not match the line numbers mentioned below, please contact your eSHARE Customer Success Manager.
On the newly registered application page, navigate to the 'Manage' > 'Manifest' tab.
In the application's manifest, look for 'requiredResourceAccess'.

Replace the above string (including the comma at the end) from line 53 to 63 with the text below.
"requiredResourceAccess": [
		{
			"resourceAppId": "c5393580-f805-4401-95e8-94b7a6ef2fc2",
			"resourceAccess": [
				{
					"id": "594c1fb6-4f81-4475-ae41-0c394909246c",
					"type": "Role"
				},
				{
					"id": "4807a72c-ad38-4250-94c9-4eabfe26cd55",
					"type": "Role"
				}
			]
		},
		{
			"resourceAppId": "00000003-0000-0ff1-ce00-000000000000",
			"resourceAccess": [
				{
					"id": "d13f72ca-a275-4b96-b789-48ebcc4da984",
					"type": "Role"
				}
			]
		},
		{
			"resourceAppId": "00000012-0000-0000-c000-000000000000",
			"resourceAccess": [
				{
					"id": "c9c9a04d-3b66-4ca8-a00c-fca953e2afd3",
					"type": "Scope"
				},
				{
					"id": "7f740376-647b-4ad7-9ff7-292af252707a",
					"type": "Role"
				}
			]
		},
		{
			"resourceAppId": "870c4f2e-85b6-4d43-bdda-6ed9a579b725",
			"resourceAccess": [
				{
					"id": "34f7024b-1bed-402f-9664-f5316a1e1b4a",
					"type": "Scope"
				}
			]
		},
        		{
			"resourceAppId": "00000002-0000-0ff1-ce00-000000000000",
			"resourceAccess": [
				{
					"id": "dc50a0fb-09a3-484d-be87-e023b12c6440",
					"type": "Role"
				}
			]
		},
		{
			"resourceAppId": "00000003-0000-0000-c000-000000000000",
			"resourceAccess": [
				{
					"id": "7ab1d382-f21e-4acd-a863-ba3e13f7da61",
					"type": "Role"
				},
				{
					"id": "98830695-27a2-44f7-8c18-0c3ebc9698f6",
					"type": "Role"
				},
				{
					"id": "883ea226-0bf2-4a8f-9f9d-92c9162a727d",
					"type": "Role"
				},
				{
					"id": "df021288-bdef-4463-88db-98f22de89214",
					"type": "Role"
				},
				{
					"id": "e1fe6dd8-ba31-4d61-89e7-88639da4683d",
					"type": "Scope"
				}
			]
		}
	],
Click the 'Save' button in the top menu bar.
In the same application manifest, look for 'web' at lines 138 to 141 and replace it with the text below.
	    "web": {
        "homePageUrl": null,
        "logoutUrl": null,
        "redirectUris": [
            "https://www.ncryptedcloud.com/oauth2_openid/consume/outlook",
            "https://www.ncryptedcloud.com/oauth2_openid/consume/labels",
            "https://www.ncryptedcloud.com/oauth2_openid/consume/personal_graphAPI",
            "https://login.ncryptedcloud.com/oauth2_openid/consume/personal_graphAPI",
            "https://n11d.com/oauth2_openid/consume/graphAPI",
            "https://login.ncryptedcloud.com/oauth2_openid/consume/graphAPI",
            "https://login.ncryptedcloud.com/oauth2_openid/consume/outlook",
            "https://login.ncryptedcloud.com/cloudwebportal/onedrive/auth/endpoint/provisioning/",
            "https://login.ncryptedcloud.com/cloudwebportal/onedrive/auth/endpoint/business/",
            "https://login.ncryptedcloud.com/oauth2_openid/consume/adgraph",
            "https://login.ncryptedcloud.com/oauth2_openid/consume/sharepoint_search"
        ],
Click the 'Save' button in the top menu bar.
In the same application manifest, look for 'redirectUriSettings' at lines 158 to 159 and replace it with the text below.
		"redirectUriSettings": [
            {
                "uri": "https://www.ncryptedcloud.com/oauth2_openid/consume/outlook",
                "index": null
            },
            {
                "uri": "https://www.ncryptedcloud.com/oauth2_openid/consume/labels",
                "index": null
            },
            {
                "uri": "https://www.ncryptedcloud.com/oauth2_openid/consume/personal_graphAPI",
                "index": null
            },
            {
                "uri": "https://login.ncryptedcloud.com/oauth2_openid/consume/personal_graphAPI",
                "index": null
            },
            {
                "uri": "https://n11d.com/oauth2_openid/consume/graphAPI",
                "index": null
            },
            {
                "uri": "https://login.ncryptedcloud.com/oauth2_openid/consume/graphAPI",
                "index": null
            },
            {
                "uri": "https://login.ncryptedcloud.com/oauth2_openid/consume/outlook",
                "index": null
            },
            {
                "uri": "https://login.ncryptedcloud.com/cloudwebportal/onedrive/auth/endpoint/provisioning/",
                "index": null
            },
            {
                "uri": "https://login.ncryptedcloud.com/cloudwebportal/onedrive/auth/endpoint/business/",
                "index": null
            },
            {
                "uri": "https://login.ncryptedcloud.com/oauth2_openid/consume/adgraph",
                "index": null
            },
            {
                "uri": "https://login.ncryptedcloud.com/oauth2_openid/consume/sharepoint_search",
                "index": null
            }
        ]
    },
Click the 'Save' button in the top menu bar.
In the same application manifest, look for 'spa' at lines 213 to 216 and replace it with the text below.
	"spa": {
        "redirectUris": [
            "https://*.sharepoint.com/_forms/default.aspx"
        ]
    }
}
Click the 'Save' button in the top menu bar.
Modify the Application Manifest - Government Cloud
On the newly registered application page, navigate to the 'Manage' > 'Manifest' tab.
In the application's manifest, look for 'replyUrlsWithType'.
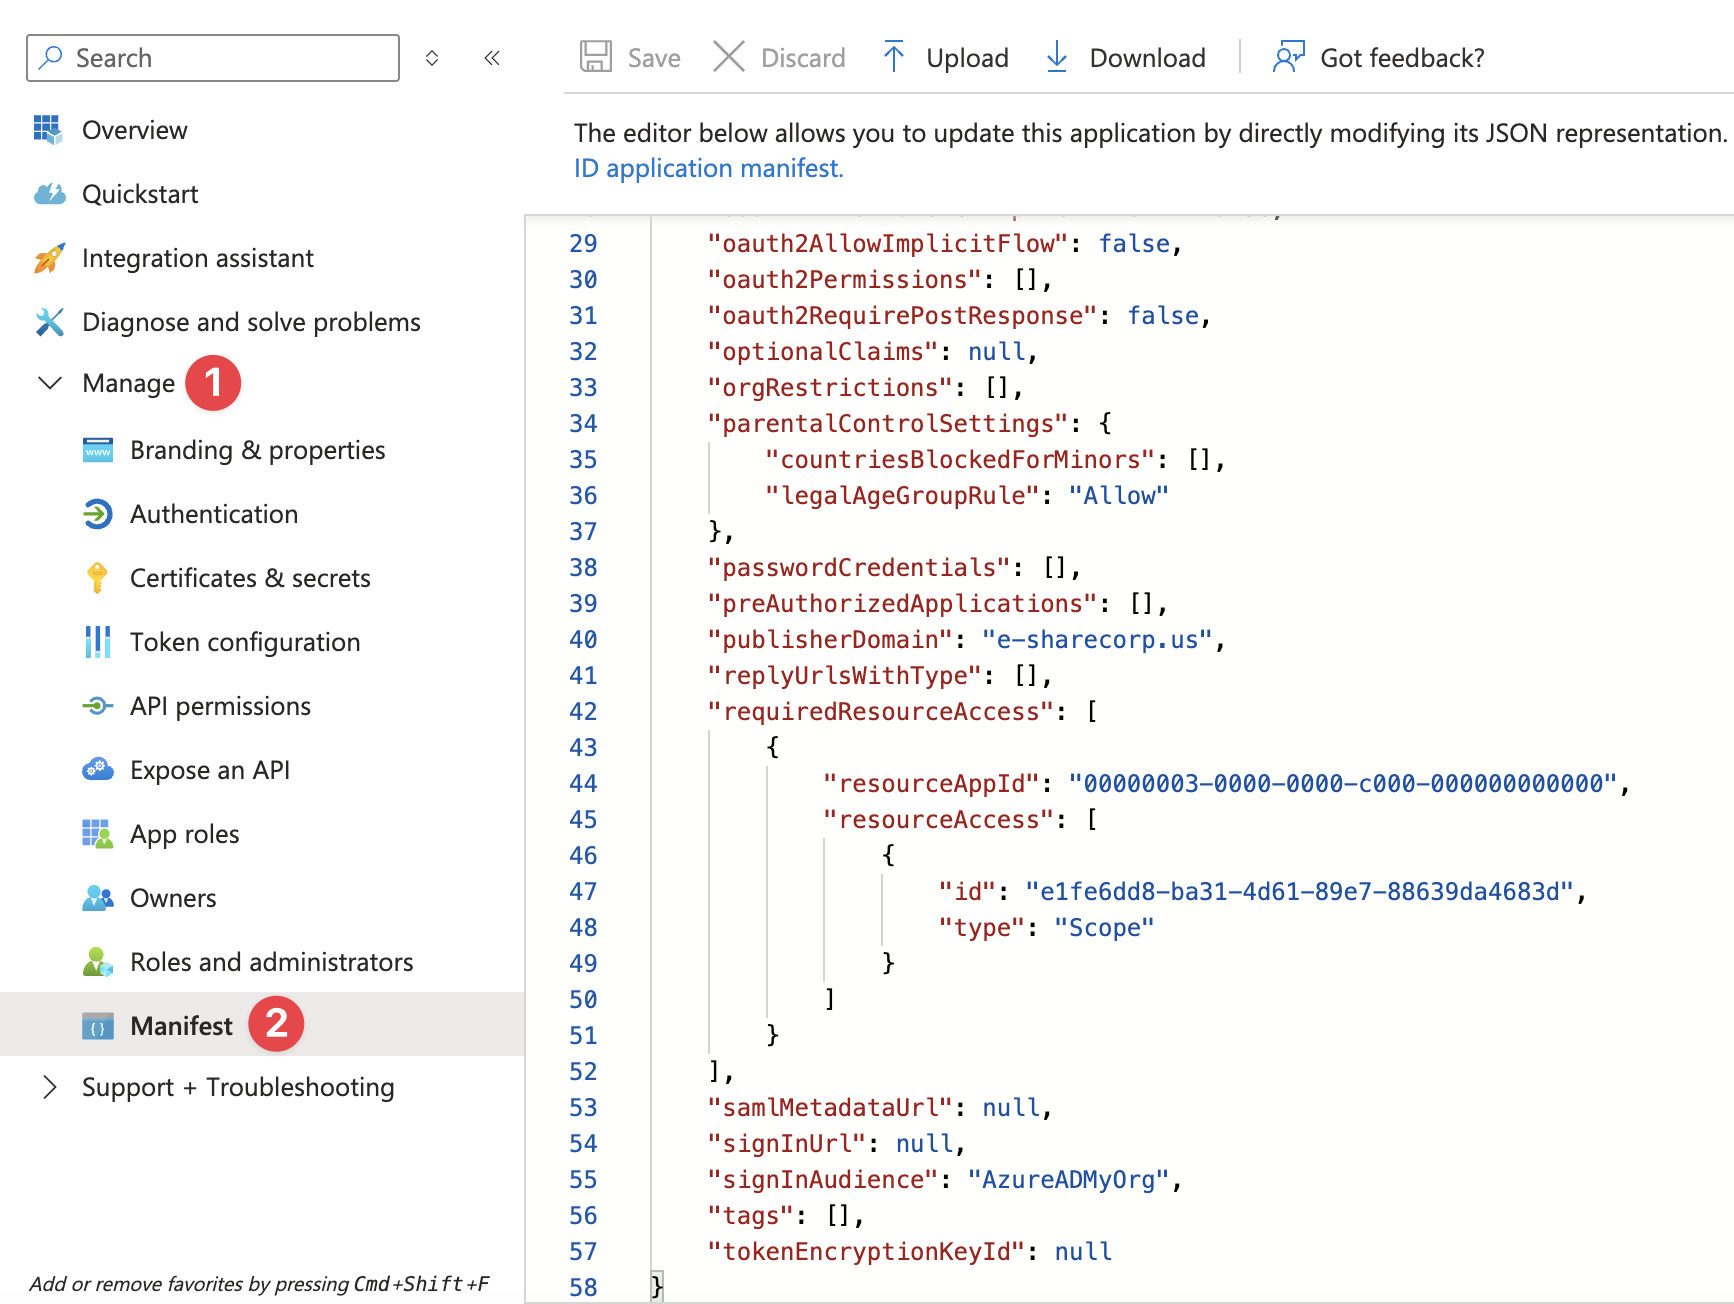
Replace the above string (including the comma at the end) from line 41 with the text below.
"replyUrlsWithType": [
        {
            "url": "https://app.e-sharegov.us/oauth2_openid/consume/adgraph",
            "type": "Web"
        },
        {
            "url": "https://app.e-sharegov.us/cloudwebportal/onedrive/auth/endpoint/business/",
            "type": "Web"
        },
        {
            "url": "https://app.e-sharegov.us/cloudwebportal/onedrive/auth/endpoint/provisioning/",
            "type": "Web"
        },
        {
            "url": "https://app.e-sharegov.us/oauth2_openid/consume/personal_graphAPI",
            "type": "Web"
        },
        {
            "url": "https://*.sharepoint.us/_forms/default.aspx",
            "type": "Spa"
        },
        {
            "url": "https://app.e-sharegov.us/oauth2_openid/consume/outlook",
            "type": "Web"
        },
        {
            "url": "https://app.e-sharegov.us/oauth2_openid/consume/sharepoint_search",
            "type": "Web"
        },
        {
            "url": "https://app.e-sharegov.us/oauth2_openid/consume/labels",
            "type": "Web"
        },
        {
            "url": "https://app.e-sharegov.us/oauth2_openid/consume/graphAPI",
            "type": "Web"
        }
    ],
Click the 'Save' button in the top menu bar.
In the same application manifest, look for 'requiredResourceAccess' at lines 79 to 89 and replace it with the text below.
"requiredResourceAccess": [
		{
			"resourceAppId": "c5393580-f805-4401-95e8-94b7a6ef2fc2",
			"resourceAccess": [
				{
					"id": "594c1fb6-4f81-4475-ae41-0c394909246c",
					"type": "Role"
				},
				{
					"id": "4807a72c-ad38-4250-94c9-4eabfe26cd55",
					"type": "Role"
				}
			]
		},
		{
			"resourceAppId": "00000003-0000-0000-c000-000000000000",
			"resourceAccess": [
				{
					"id": "e1fe6dd8-ba31-4d61-89e7-88639da4683d",
					"type": "Scope"
				},
				{
					"id": "7ab1d382-f21e-4acd-a863-ba3e13f7da61",
					"type": "Role"
				},
				{
					"id": "98830695-27a2-44f7-8c18-0c3ebc9698f6",
					"type": "Role"
				},
				{
					"id": "883ea226-0bf2-4a8f-9f9d-92c9162a727d",
					"type": "Role"
				},
				{
					"id": "df021288-bdef-4463-88db-98f22de89214",
					"type": "Role"
				}
			]
		},
		{
			"resourceAppId": "00000012-0000-0000-c000-000000000000",
			"resourceAccess": [
				{
					"id": "c9c9a04d-3b66-4ca8-a00c-fca953e2afd3",
					"type": "Scope"
				},
				{
					"id": "7f740376-647b-4ad7-9ff7-292af252707a",
					"type": "Role"
				}
			]
		},
		{
			"resourceAppId": "870c4f2e-85b6-4d43-bdda-6ed9a579b725",
			"resourceAccess": [
				{
					"id": "34f7024b-1bed-402f-9664-f5316a1e1b4a",
					"type": "Scope"
				}
			]
		},
		{
			"resourceAppId": "00000003-0000-0ff1-ce00-000000000000",
			"resourceAccess": [
				{
					"id": "d13f72ca-a275-4b96-b789-48ebcc4da984",
					"type": "Role"
				}
			]
		},
		{
			"resourceAppId": "00000002-0000-0ff1-ce00-000000000000",
			"resourceAccess": [
				{
					"id": "dc50a0fb-09a3-484d-be87-e023b12c6440",
					"type": "Role"
				}
			]
		}
	],
Click the 'Save' button in the top menu bar.
Grant Admin Consent for API Permissions
REQUIREMENT:
Granting admin consent for permissions within an app registration must be performed by a Global Administrator in the destination M365 tenant.
Important:
Please consult your eSHARE Customer Success Manager before removing any API permissions.
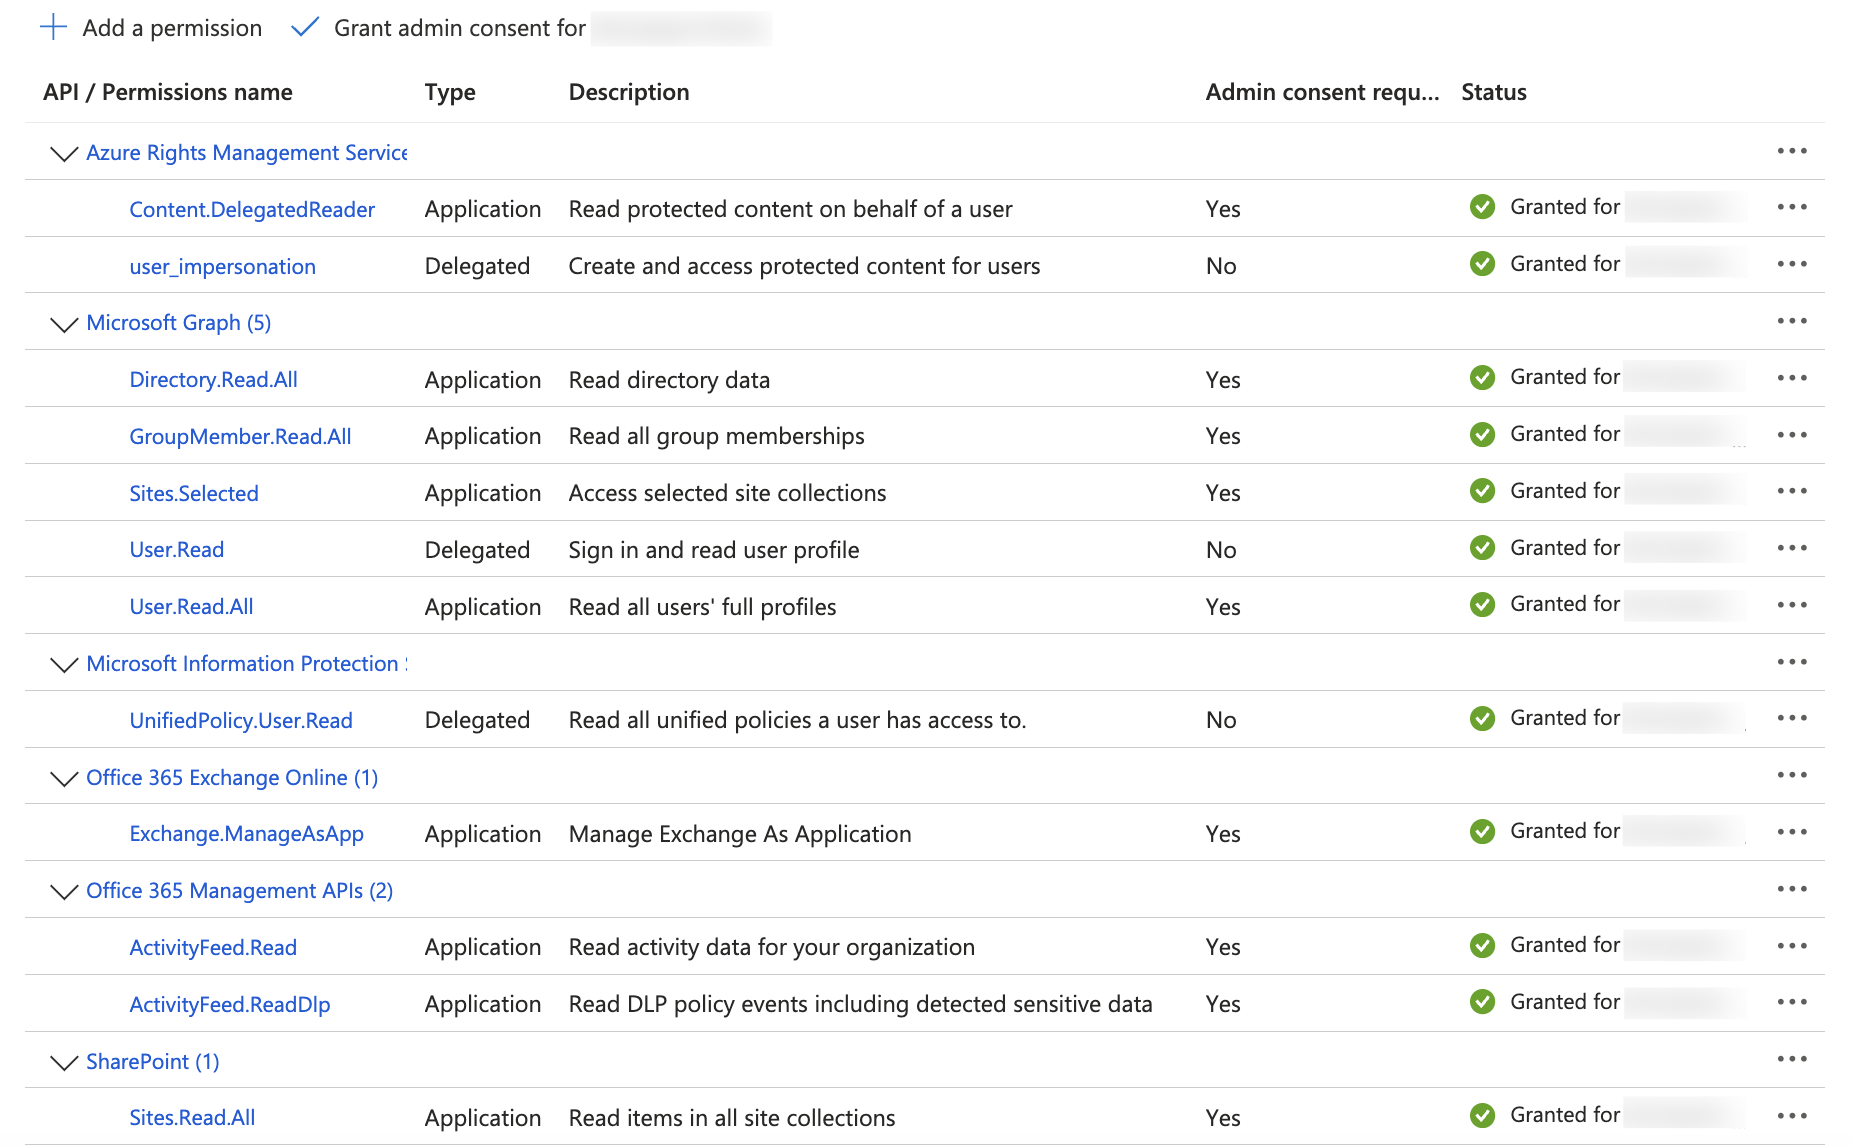
For the saved application, navigate to the 'Manage' > 'API permissions' tab.
Select 'Grant admin consent for <tenant name>' at the top of the API permissions table.
Confirm when prompted.
Upload the Application Certificate
Obtain a certificate using one of the following options:
Option 1: Purchase a certificate from a well-known certificate authority and extract the private and public portions of the certificate. Upload the public portion in the Azure portal for the application and upload the private key in your eSHARE Admin Console (or provide the private key to your eSHARE admin).
Option 2: Create a self-signed certificate by following the instructions available at https://learn.microsoft.com/en-us/azure/active-directory/develop/howto-create-self-signed-certificate. A short summary of those instructions is below.
# Create a self-signed certificate in PowerShell
$mycert = "eShareApp"
$mycert = New-SelfSignedCertificate -DnsName "eShareApp" -Subject "CN=eShareApp" -CertStoreLocation "Cert:\CurrentUser\My" -NotAfter (Get-Date).AddYears(50) -KeyExportPolicy Exportable -KeySpec Signature -KeyLength 2048 -KeyAlgorithm RSA -HashAlgorithm SHA256
# Extract .key file using OpenSSL
openssl pkcs12 -in eShareApp.pfx -nocerts -nodes -out eShareApp.key# Extract crt from pfx using OpenSSL
openssl pkcs12 -in eShareApp.pfx -clcerts -nokeys -out eShareApp.crt# Export certificate to .pfx file
$mycert | Export-PfxCertificate -FilePath eShareApp.pfx -Password $(ConvertTo-SecureString -String "myp@55W0rd" -AsPlainText -Force)When the appropriate certificate portions are available, navigate to 'Manage' > 'Certificates & secrets'.
On the 'Certificates' tab, click the 'Upload certificate' button.
Upload the CRT file from the steps above and click 'Add' at the bottom of the open pane.
Collect the Values Required for the eSHARE Tenant
Collect and save the following values:
M365 Tenant ID: Navigate to the 'Identity' > 'Overview' tab of the Entra admin center, copy the 'Tenant ID' and save it.
Application ID: Navigate to the 'Overview' tab of the application, copy the 'Application (client) ID' and save it.
Certificate Thumbprint: For the certificate used during the application registration process, copy the certificate thumbprint and save it.
Private Key: The private key (.key file from the steps above) for the certificate uploaded in the Entra portal for the application registration.
Grant eSHARE Application Permissions to SharePoint and OneDrive Sites
How to get SharePoint Site ID
Please refer to the following documentation for how to get the Site ID for a SharePoint site: Get a SharePoint Site - Microsoft Graph v1.0 | Microsoft Learn
How to get Personal Site ID for User’s OneDrive
Endpoint: https://graph.microsoft.com/v1.0/users/<user_upn>/drive/SharePointIds
Method: GET
Sample Response:
{
"@odata.context": "https://graph.microsoft.com/v1.0/$metadata#users('ericf%40apharmacorp.com')/drive/sharePointIds",
"listId": "6c90b104-b67a-4c8d-9854-378eaaf97c88",
"listItemId": null,
"listItemUniqueId": null,
"siteId": "3421cee4-76b0-4952-8525-05b9e55367d8",
"siteUrl": "https://apharmacorp-my.sharepoint.com/personal/ericf_apharmacorp_com",
"tenantId": "abe04a8b-c24b-4e4c-87ba-a07aa5bde8bb",
"webId": "79ada273-efc6-4d84-ba93-8f1efd7afd8c"
}
How to Grant eSHARE Application Permission to Sites
Endpoint: https://graph.microsoft.com/v1.0/sites/<your_site_id>/permissions
Method: POST
Body:
{
    "roles": [
        "write"
    ],
    "grantedToIdentities": [
        {
            "application": {
                "id": "<your_eshare_app_id>",
                "displayName": "<your_eshare_app_name>"
            }
        }
    ]
}
Sample Response:
{
"@odata.context": "https://graph.microsoft.com/v1.0/$metadata#sites('af1038a9-1db8-4b7a-9dbb-1b0cab9c66e9')/permissions/$entity",
"id": "aTowaS50fG1zLnNwLmV4dHw4M2EzZGM1MC04MmFkLTRhNzItOGVmYy1mMDk3ZTg4MWQ0NTNAYWJlMDRhOGItYzI0Yi00ZTRjLTg3YmEtYTA3YWE1YmRlOGJi",
"roles": [
"write"
],
"grantedToIdentitiesV2": [
{
"application": {
"displayName": "eSHARE GRAPH App",
"id": "83a3dc50-82ad-4a72-8efc-f097e881d453"
}
}
],
"grantedToIdentities": [
{
"application": {
"displayName": "eSHARE GRAPH App",
"id": "83a3dc50-82ad-4a72-8efc-f097e881d453"
}
}
]
}