Purpose: This document provides users with reference materials to quickly get acquainted with using the eShare Web Portal for secure collaboration, and will cover the following topics:
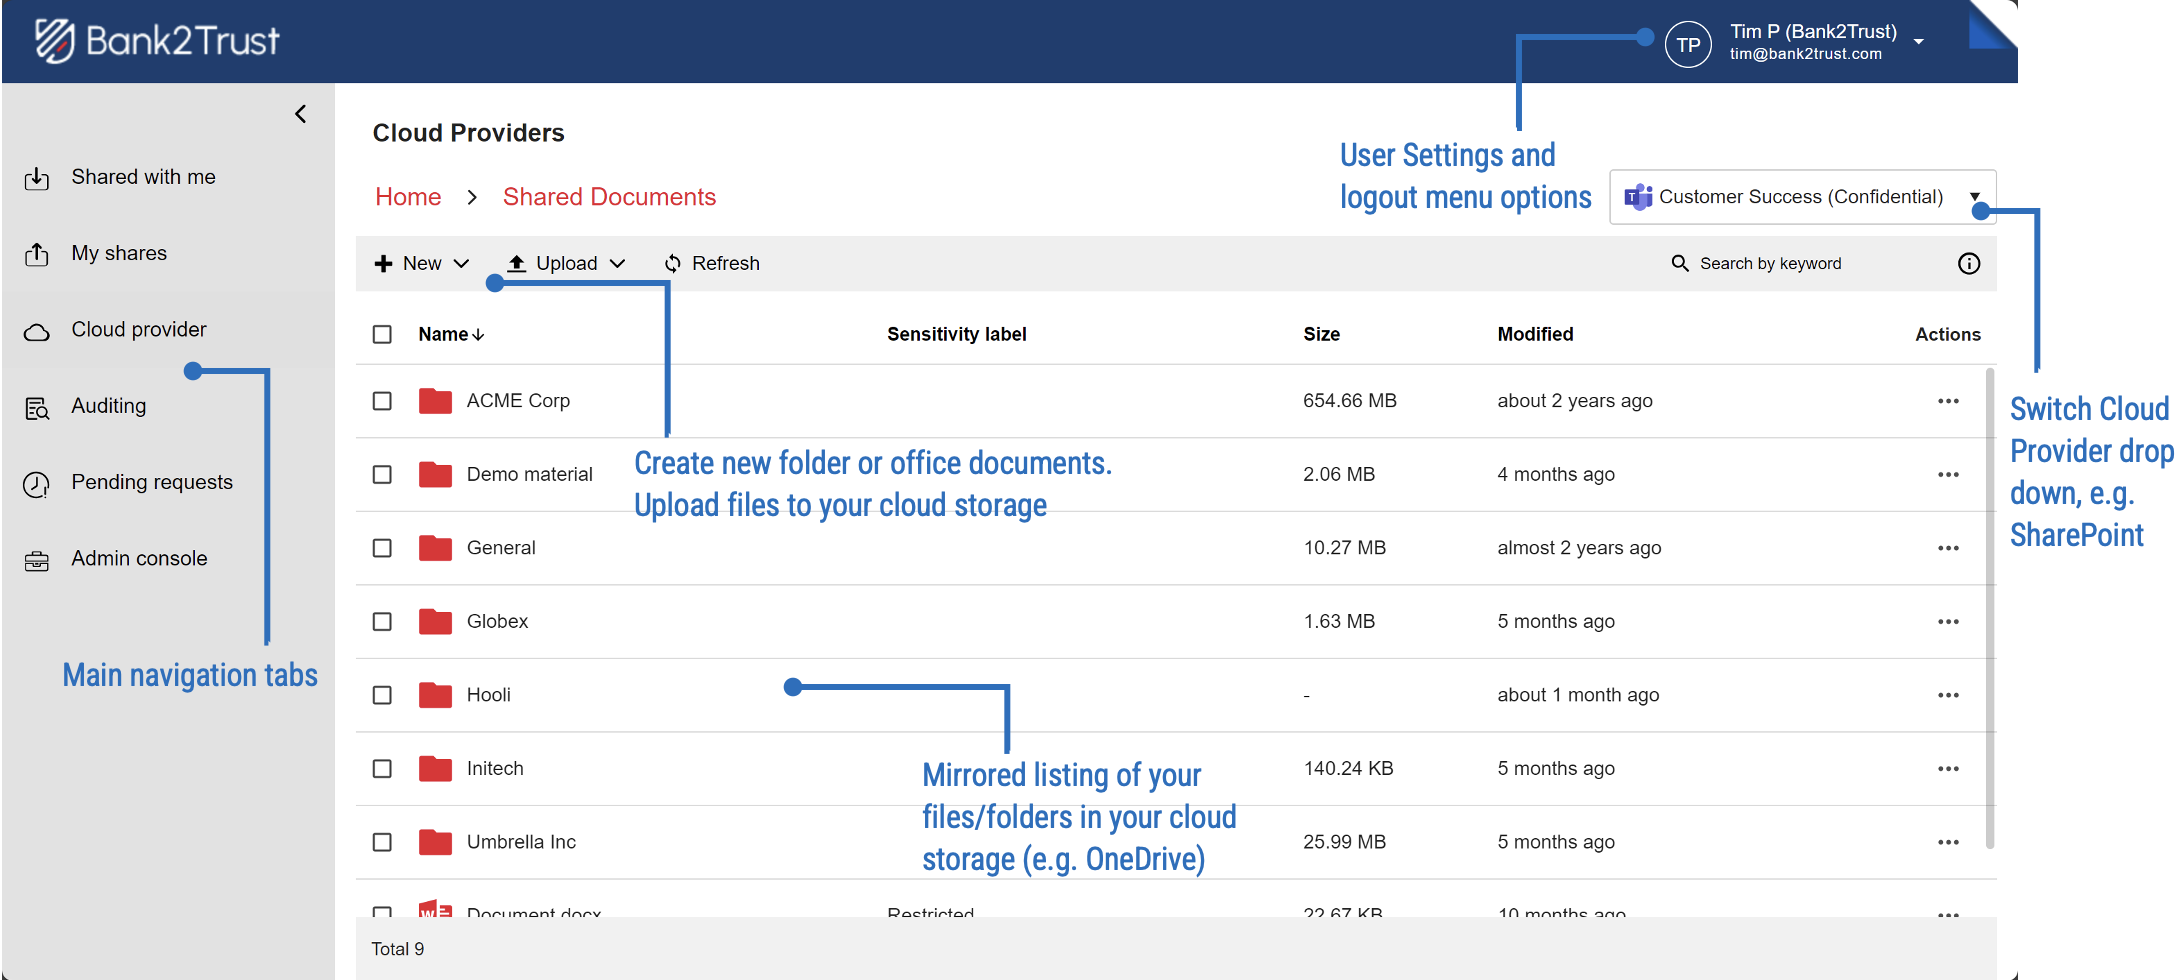
Using Your Cloud Storage
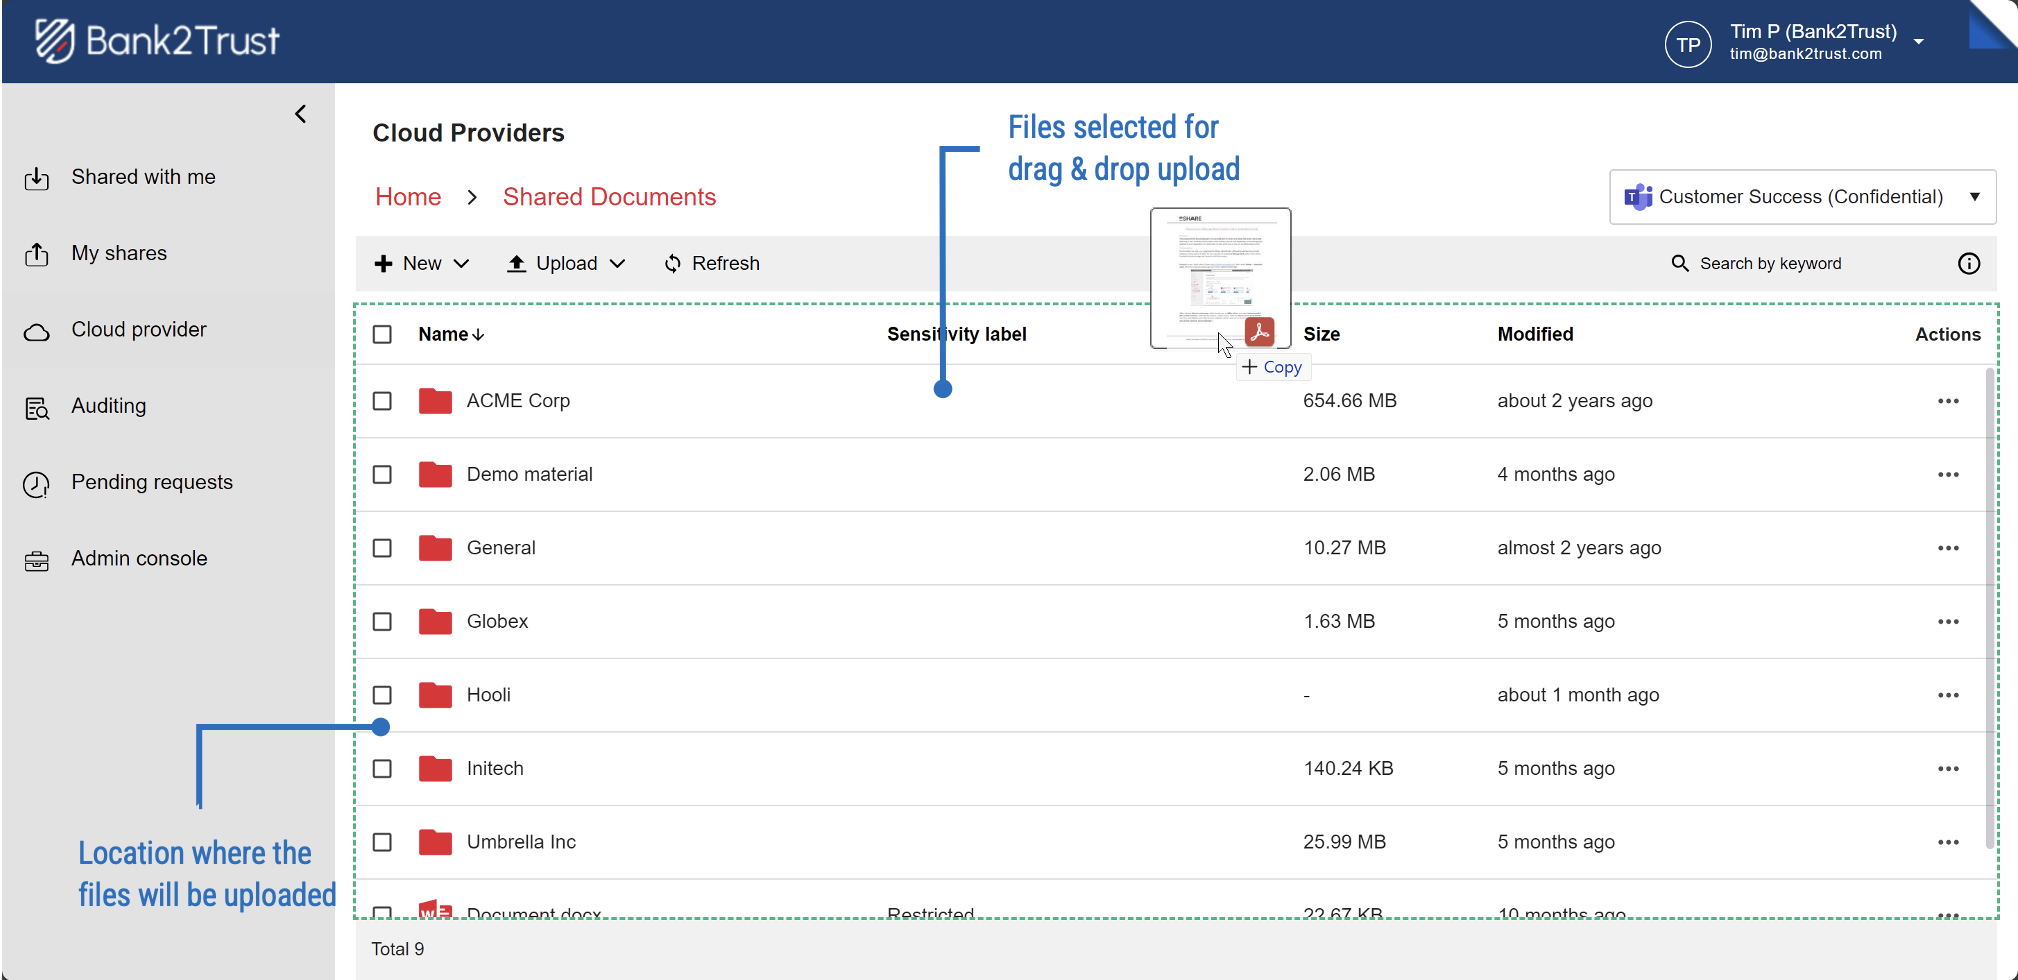
Files can be uploaded to your cloud storage via eShare in two ways, using the ‘File Upload’ option or by drag & drop method.
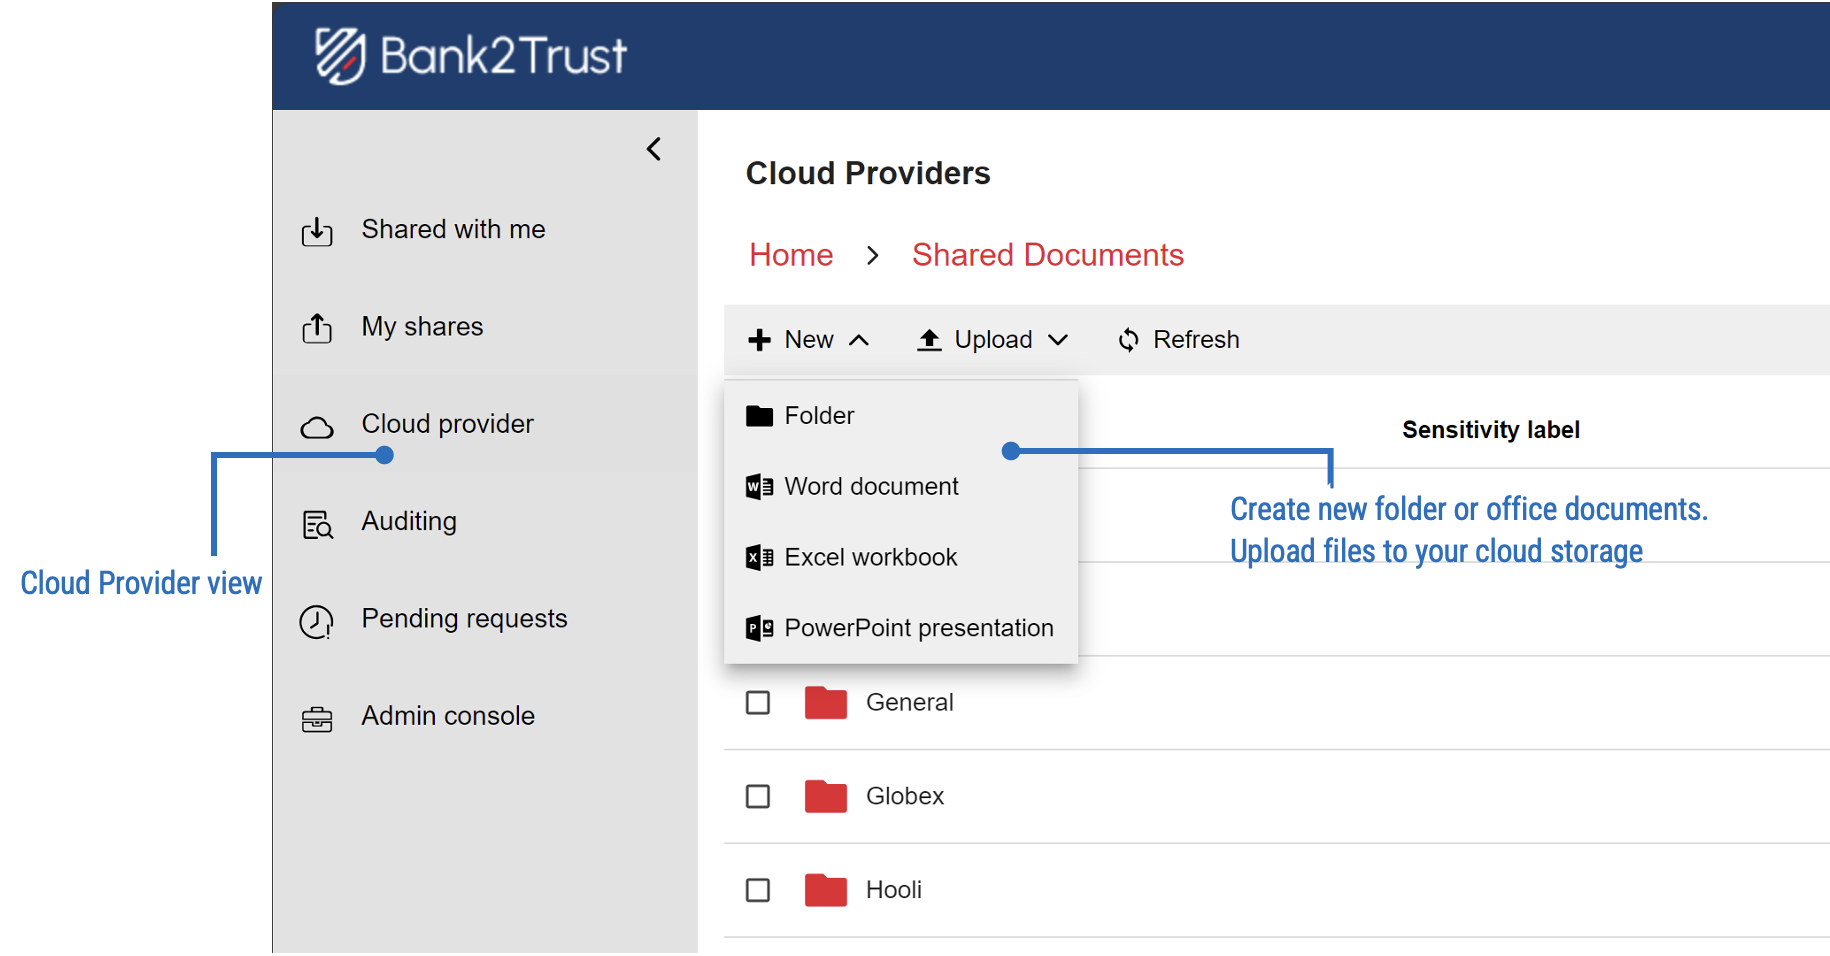
To use the ‘File Upload’ option, navigate to ‘Cloud Provider’ view, click on ‘New’ button and select ‘Upload’. A new ‘File Upload’ window appears. Select the file(s) to upload and ‘Open’ to begin uploading the files. See screenshot below for reference.
To upload files using drag & drop method, select the files from your desktop and drag them over to a folder in eShare portal to begin uploading the files. See screenshot below for reference.
Updating Files in Cloud Storage
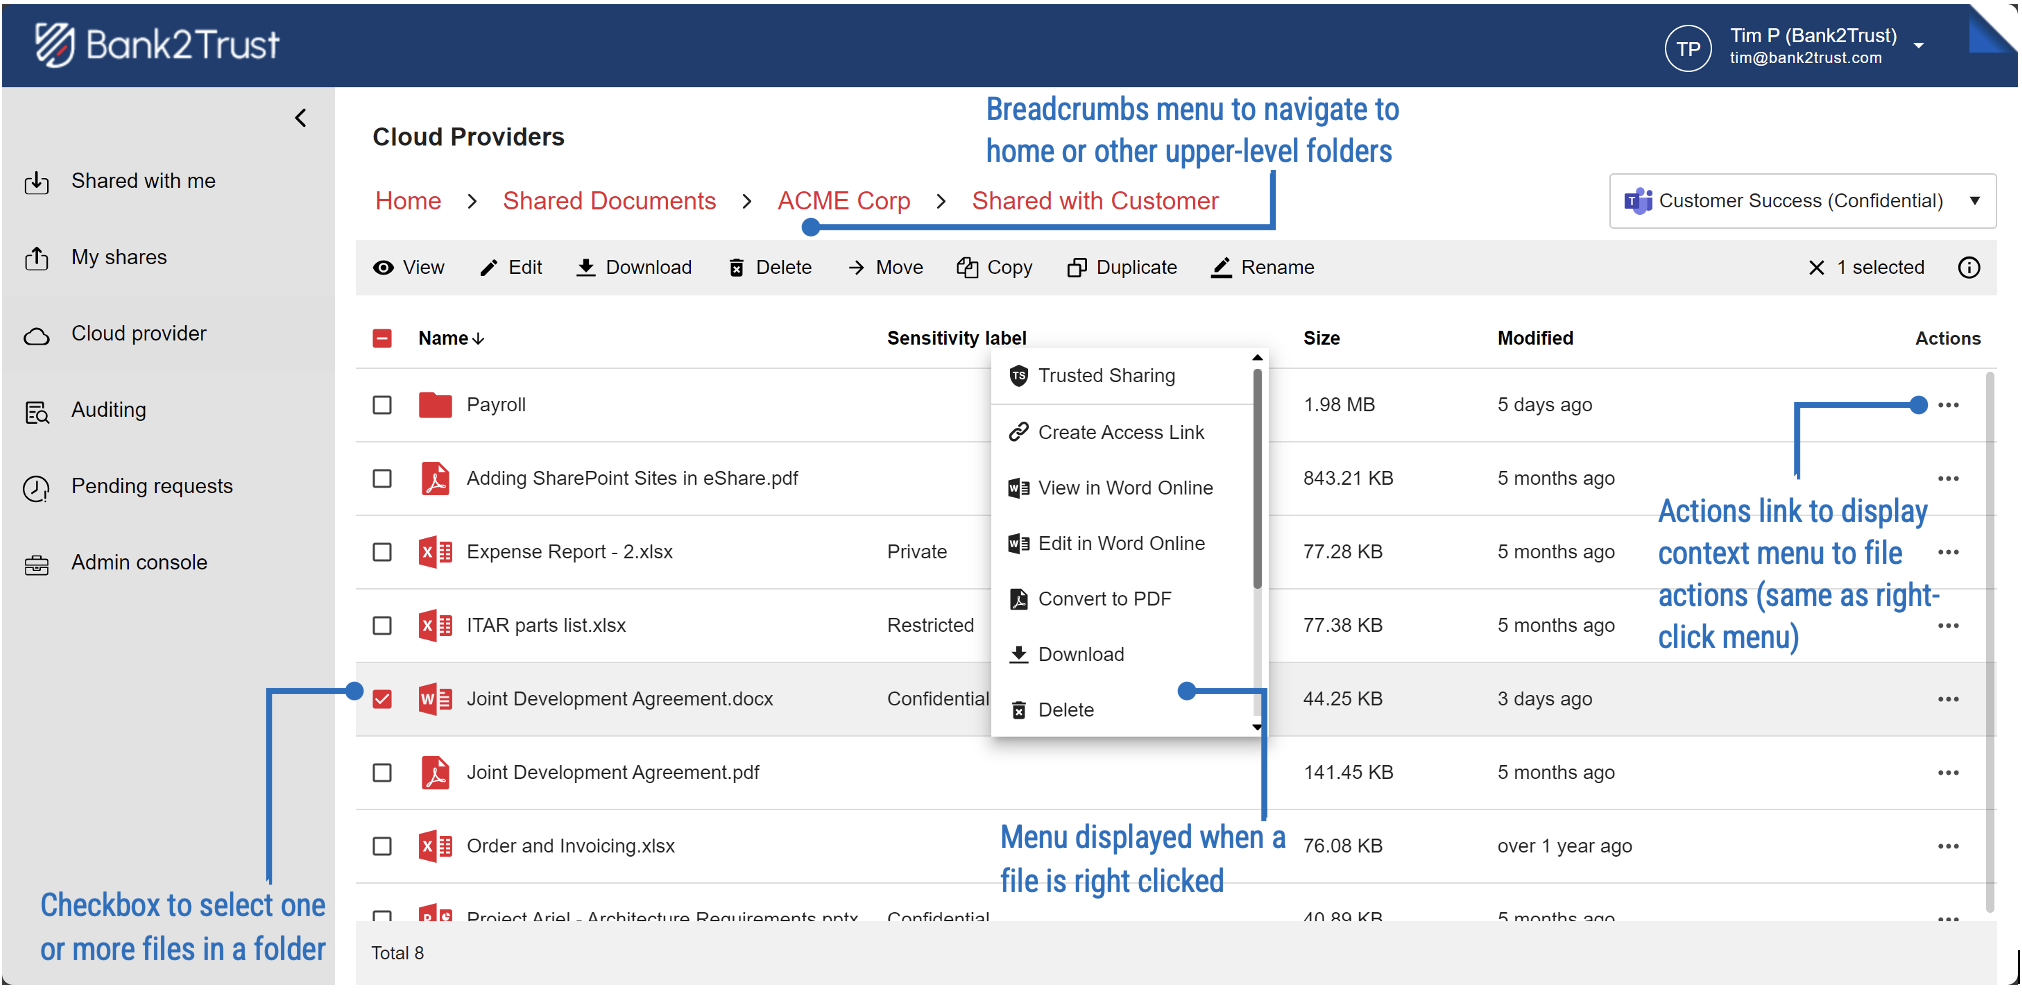
To copy, move, rename, download, or duplicate a file in place, or delete a file/folder, right click a file/folder and select the desired action. You may also use the menu option under ‘Actions’ column to accomplish this. This view will also allow for bulk file/folder actions by selecting the checkbox next to each file/folder you may Download, Delete, Move, or Copy multiple files/folders.
Creating New Microsoft Documents
In addition to the above, you may edit or create Office 365 files (Word, Excel, PowerPoint) via eShare using the menu options shown above.
Creating a Trusted Share
To securely share files/folders with others, right-click a file/folder or expose the Actions menu and select ‘Trusted Sharing’ as shown below.
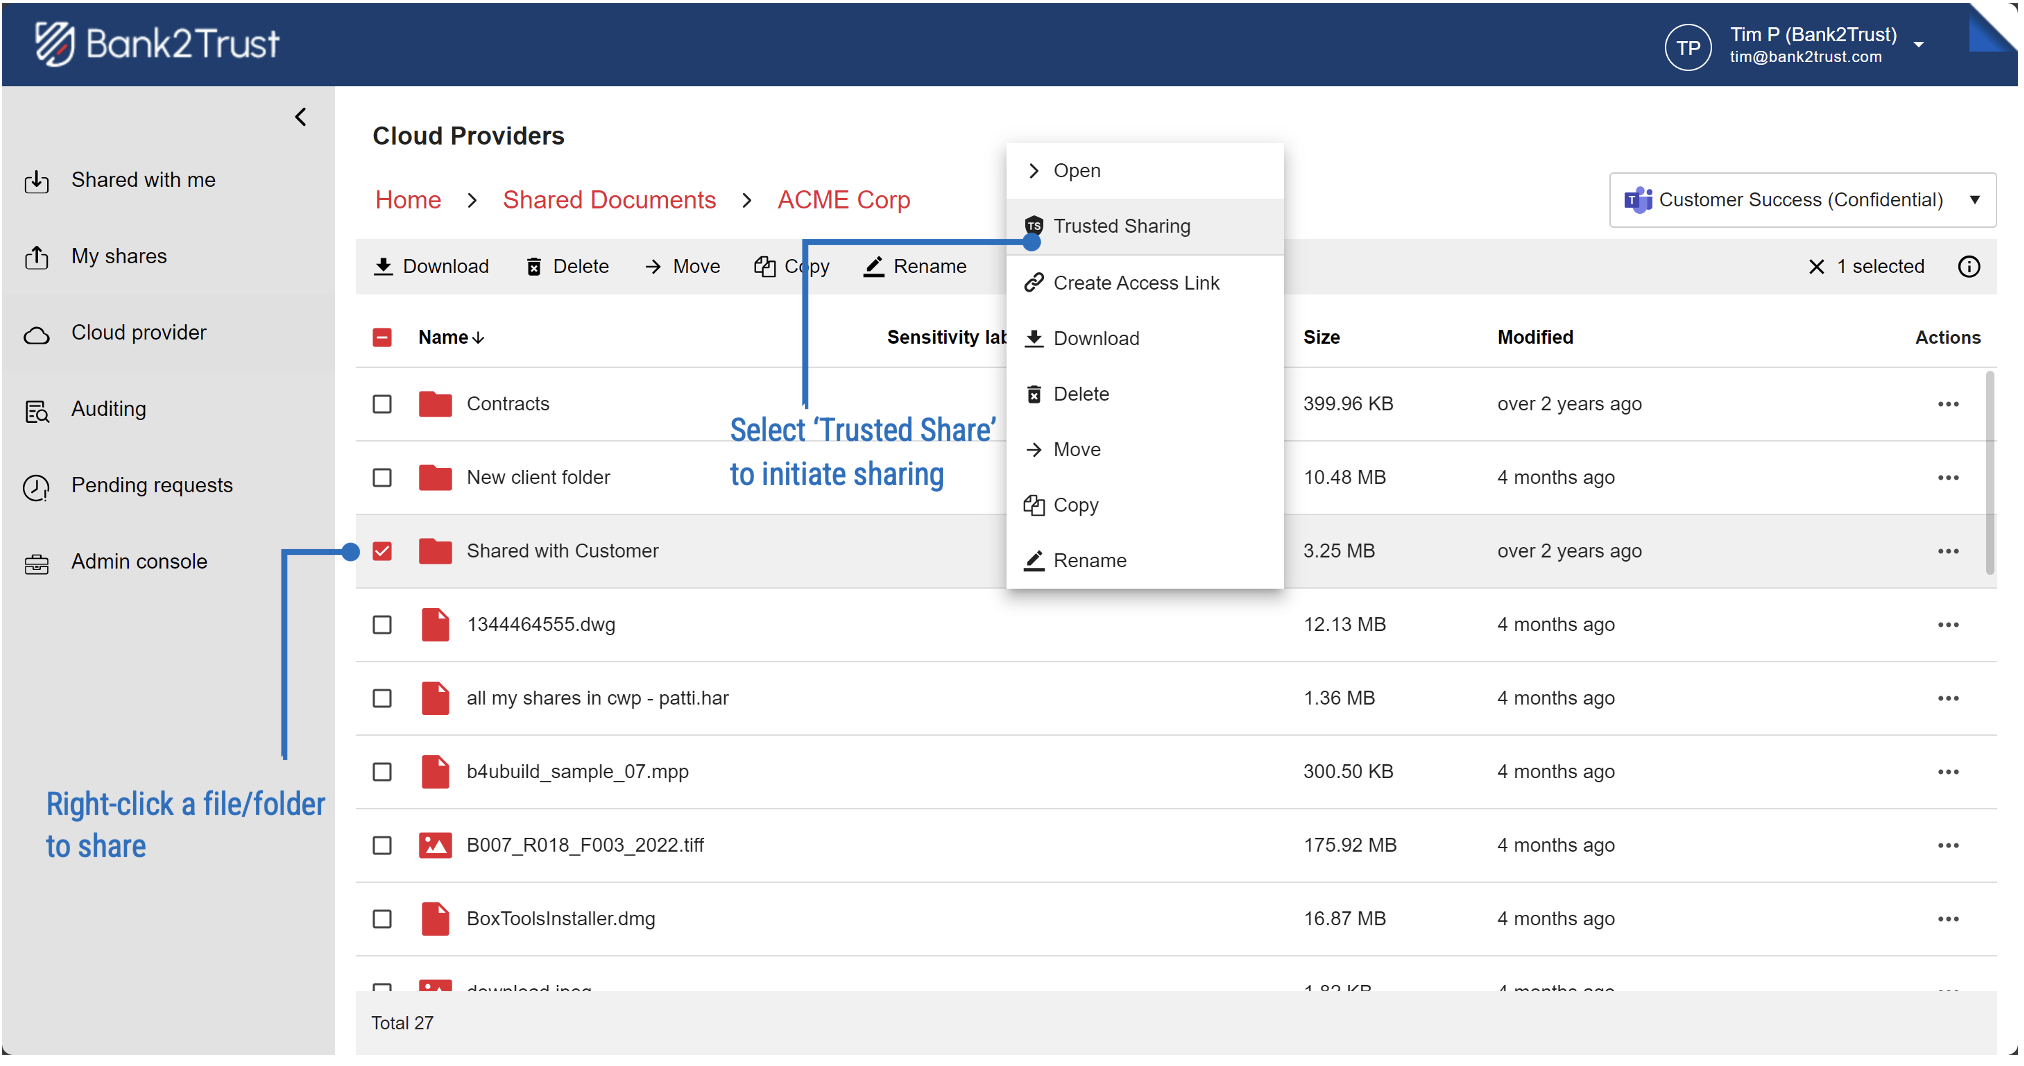
In the displayed Trusted Share window, edit the share name if desired (default is the name of the file/folder selected for sharing), input email address of the recipient(s), enter a custom message if desired and click ‘Share’.
From the Trusted Share pop-up select the Sharing Policy via a drop-down link. These policies are created by the eShare Administrator. The Options button next to the Sharing Policy drop down will show you the specific settings and depending on how the policy was setup will allow you to override some policy settings. The ability to override Sharing Policy options are setup at the time the policy was created and are managed by your eShare Administrator.
Trusted Share View
Clicking on a trusted share in either the Shared with me or My Shares tab or clicking on the link in an email notification, navigates you to the Trusted Share View allowing you to securely collaborate with the share owner and/or recipients.
The Trusted Share View is another area where if you are the owner of the Trusted Share you can manage access and sharing policy settings similarly to the My Shares View.
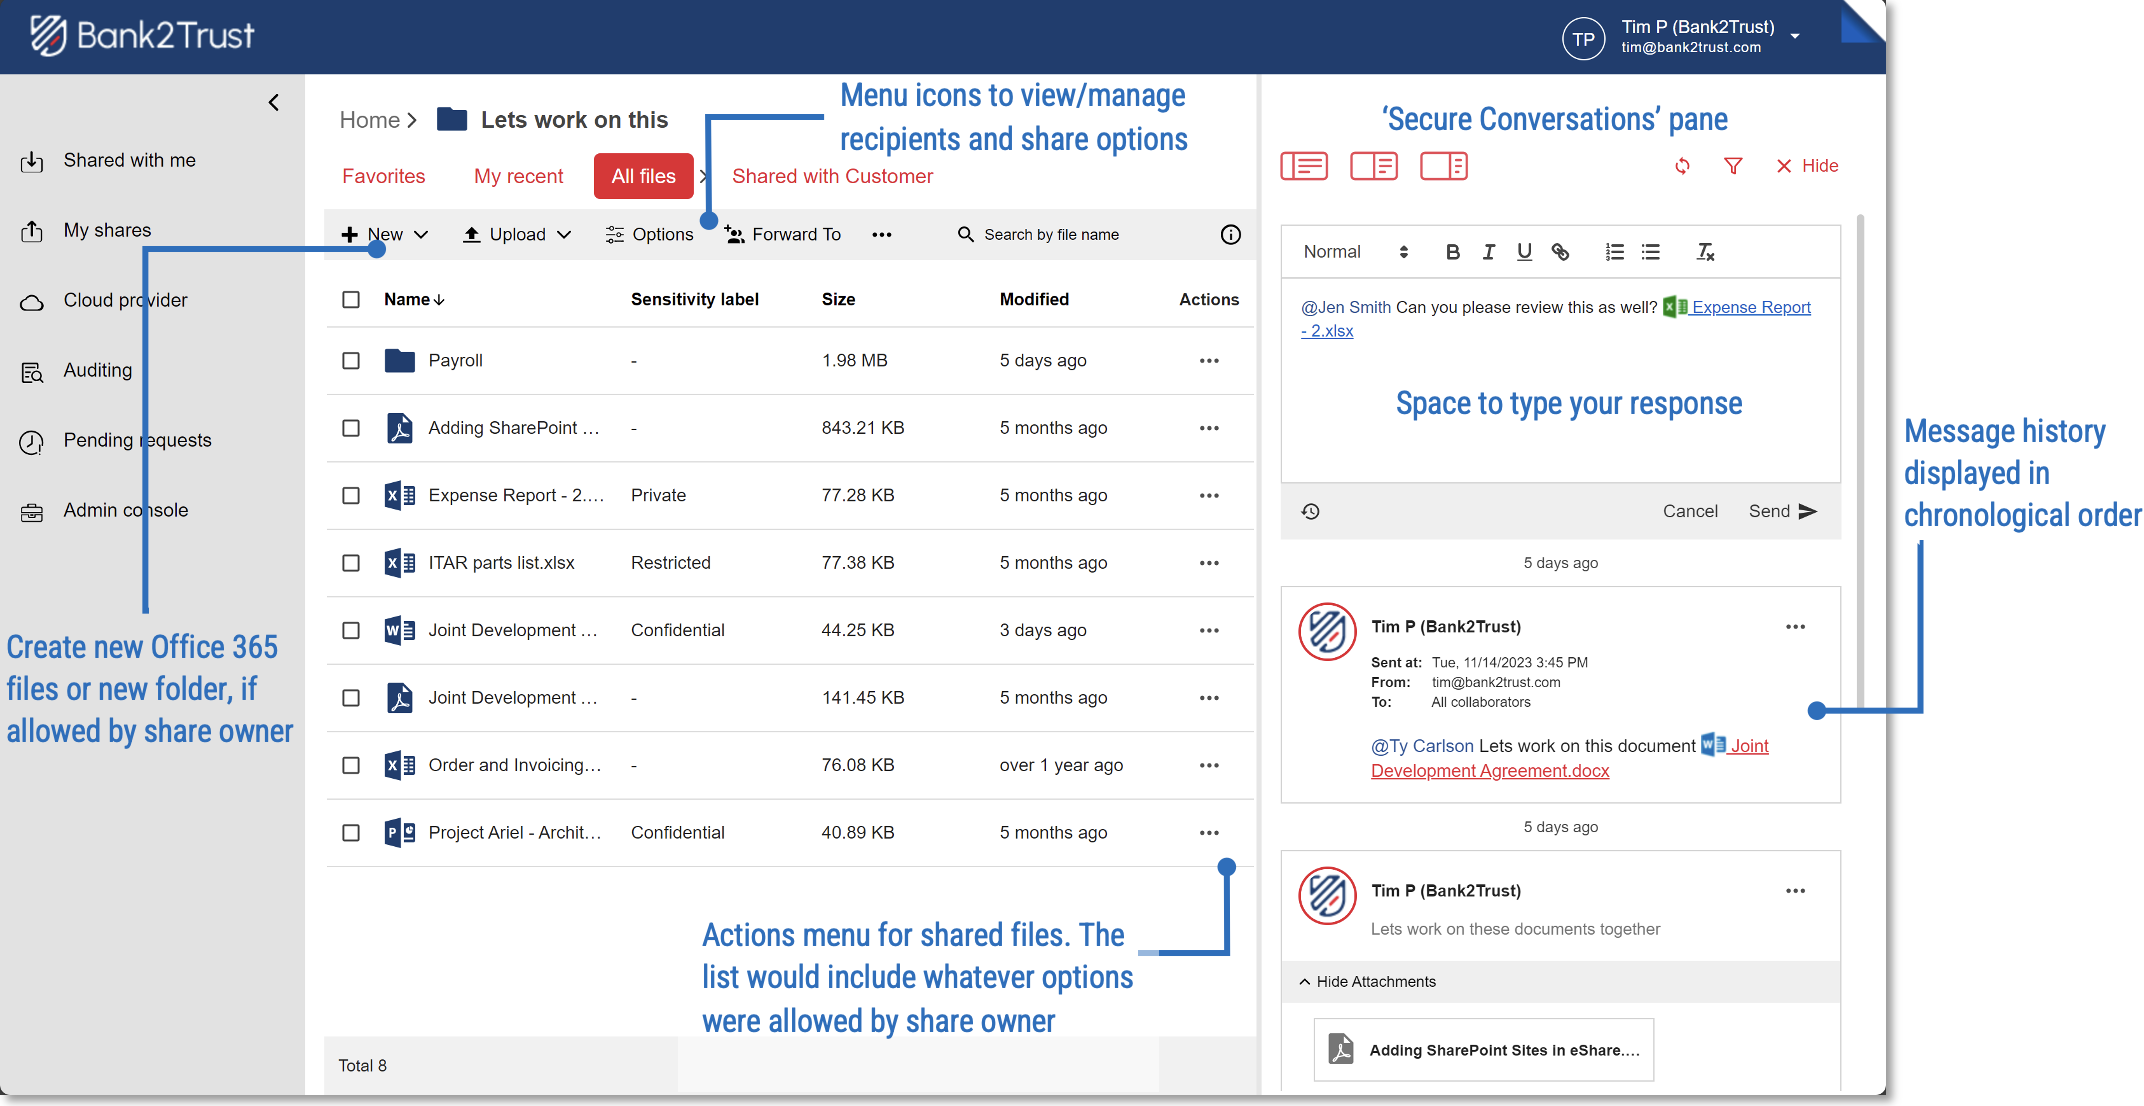
In the Trusted Share View you can perform the following actions as the owner of the Trusted Share and depending on the Sharing Policy, the recipient can also perform the following actions.
Reply Securely – Send and receive messages with collaborators in the Trusted Share. Messages sent through this method are stored securely in the share owners’ cloud provider (e.g. OneDrive). The share collaborators receive an email notification of a new message.
Create Folder – If permitted by the share owner, share recipients can create folders and sub-folders
Attach Files – When replying securely, if allowed by sharing policies, recipients may attach new files to the message
Download Files – If enabled in sharing policies by the share owner, recipients can download the shared files/folders
View Files – To view the shared files, share participants simply click on the file name
Edit Files - If permitted by the share owner, recipients can duplicate, download, copy, move, rename, delete or edit the shared files. Recipients can also view version history of the files if the files have been updated over time while they are being shared
Create New – If permitted by the share owner, recipients can create a new folder or new Office 365 documents directly in the Trusted Share via the browser
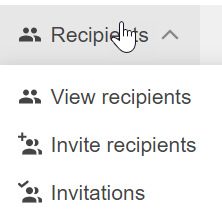
Recipients actions – If the sharing policy on the Trusted Share allows for ‘Recipients can invite others’, this drop-down will contain the below options. If the policy does not allow for invites, then only ‘View Recipients’ will be available. <See Sharing Policy Options for details>
Conversation Panel Options

Hide Conversation – Clicking on this button hides the Conversation Panel
Conversation – Clicking on this opens the Conversation Panel
Close/Open Conversation – Clicking on this button hides or opens conversation tab
Size of Conversation Panel – Click on these icons to expand and contract the Conversation Panel
Sharing Policy Options
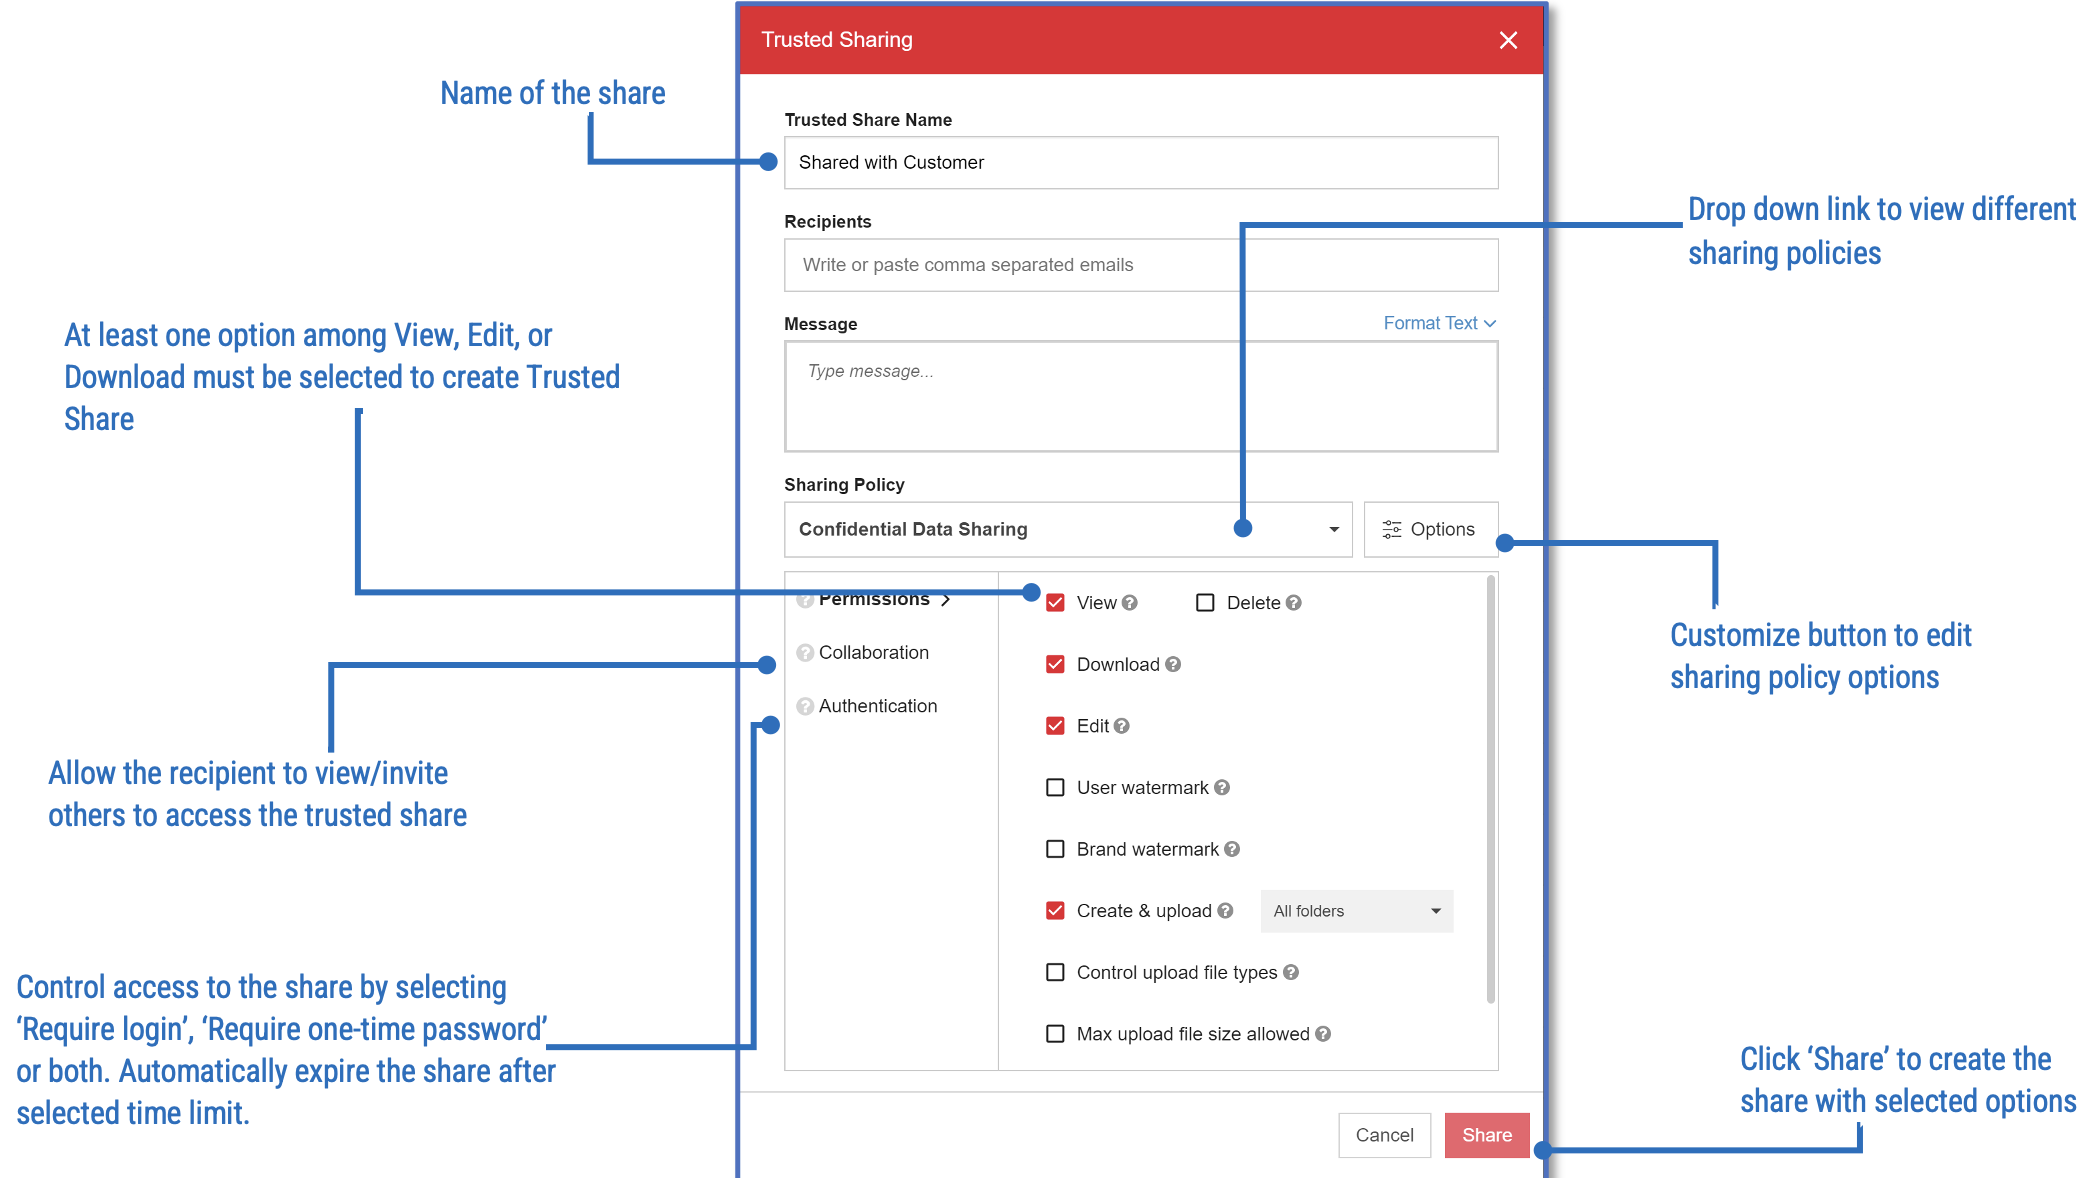
Customizing the sharing options can be done at different stages. At the time of Trusted Share Creation, click on ‘Customize’ button in ‘Trusted Share’ window and edit the available options. You may also update the Sharing Policy Options after sending a Trusted Share in either the My Shares view or in the Trusted Share Collaboration View
A brief description of the policy options is provided below:
Recipient Document Permission Settings
View – Allows the recipient to only view the files online. If ‘Download’ option is not enabled, recipients will not be able to download the file or print it
Edit – Enabling this option for Office 365 documents (Word, Excel and PowerPoint) allows the recipients to edit the shared documents online without having to download the files. Co-authoring (multiple users simultaneously editing the file) is supported with this option
Delete – This option grants share recipients the ability to delete shared files. If this option is selected then Create & Upload is selected by default.
Download – This option grants share recipients the ability to download the shared files/folder
Download with Approval - Grants share recipients the ability to download content after the owner has explicitly approved an override request
Watermark – When this option is selected, the shared files are converted to PDF and embossed with the recipient’s email and IP address. This option cannot be combined with Edit
Create & Upload – Gives recipients the ability to create new files to shared folders. This option is on by default if you select Create & Upload Folders.
Create & Upload Folders – If you set Create & Upload you can optionally allow for folders to be created or deleted.
Limit upload file types to – When checked, three additional checkboxes are presented to choose which types of documents you will allow.
Max upload file size allowed – When checked, a textbox and size drop-down allow you to set the file size limitation.
Trusted Share Access Settings
Require one-time password – A time limited one-time access code is delivered to the user via email or SMS each time they want to view the Trusted Share.
Require Login – When enabled, the recipient will be required to login to the eShare platform to access the shared files. If the recipients do not have an eShare account, they will be prompted to create a new account
Require Terms of Use – Recipients will be required to accept terms of use before being granted access to the shared files
Secure Conversations Settings
Allow Recipients to Reply Securely – Enables ‘Secure Conversations’ feature for the Trusted Share. All share participants receive email notification when a message is posted. There are 3 conversation options: All collaborators compose/reply, Owners Compose Only, or Private reply to owner and co-owner(s) only.
Activity notifications – Notifications on Trusted Shares’ activities, such as uploading, downloading, accessing a Trusted Share, and more.
Requests and Actions notifications – Notifications requiring action from Trusted Share owners/co-owners.
Message notifications – New messages and replies from Secure Conversations within your Trusted Shares.
Recipients can invite others – There are currently three options to manage the feature.
None - When set to None, the author of the Trusted Share must manually approve a person that has been suggested by a Collaborator of the Trusted Share that already belongs to the same Organization as the author or a person outside of the Organization.
Same Organization as the inviter - When Same Organization as the inviter is selected, Collaborators that suggest a person that already belongs to the organization as the author, said person is auto approved to take part in the Trusted Share.
All - When set to All, every person suggested that belongs to the same Organization as the author or is an external partner is auto approved with no further actions needed.
Recipients can view recipients list – Allow the recipients to see who else received the trusted share.
Expire Share After – This option automatically expires the share when the selected time threshold is reached, e.g. One Day, One Week, One Month, etc. After the share expires, recipients will no longer have access to shared files/folder but can request extension from the share owner.
Managing Your Shares
There are two ways you can manage the Trusted Shares created by you, within the My Shares View or within the Trusted Share View.
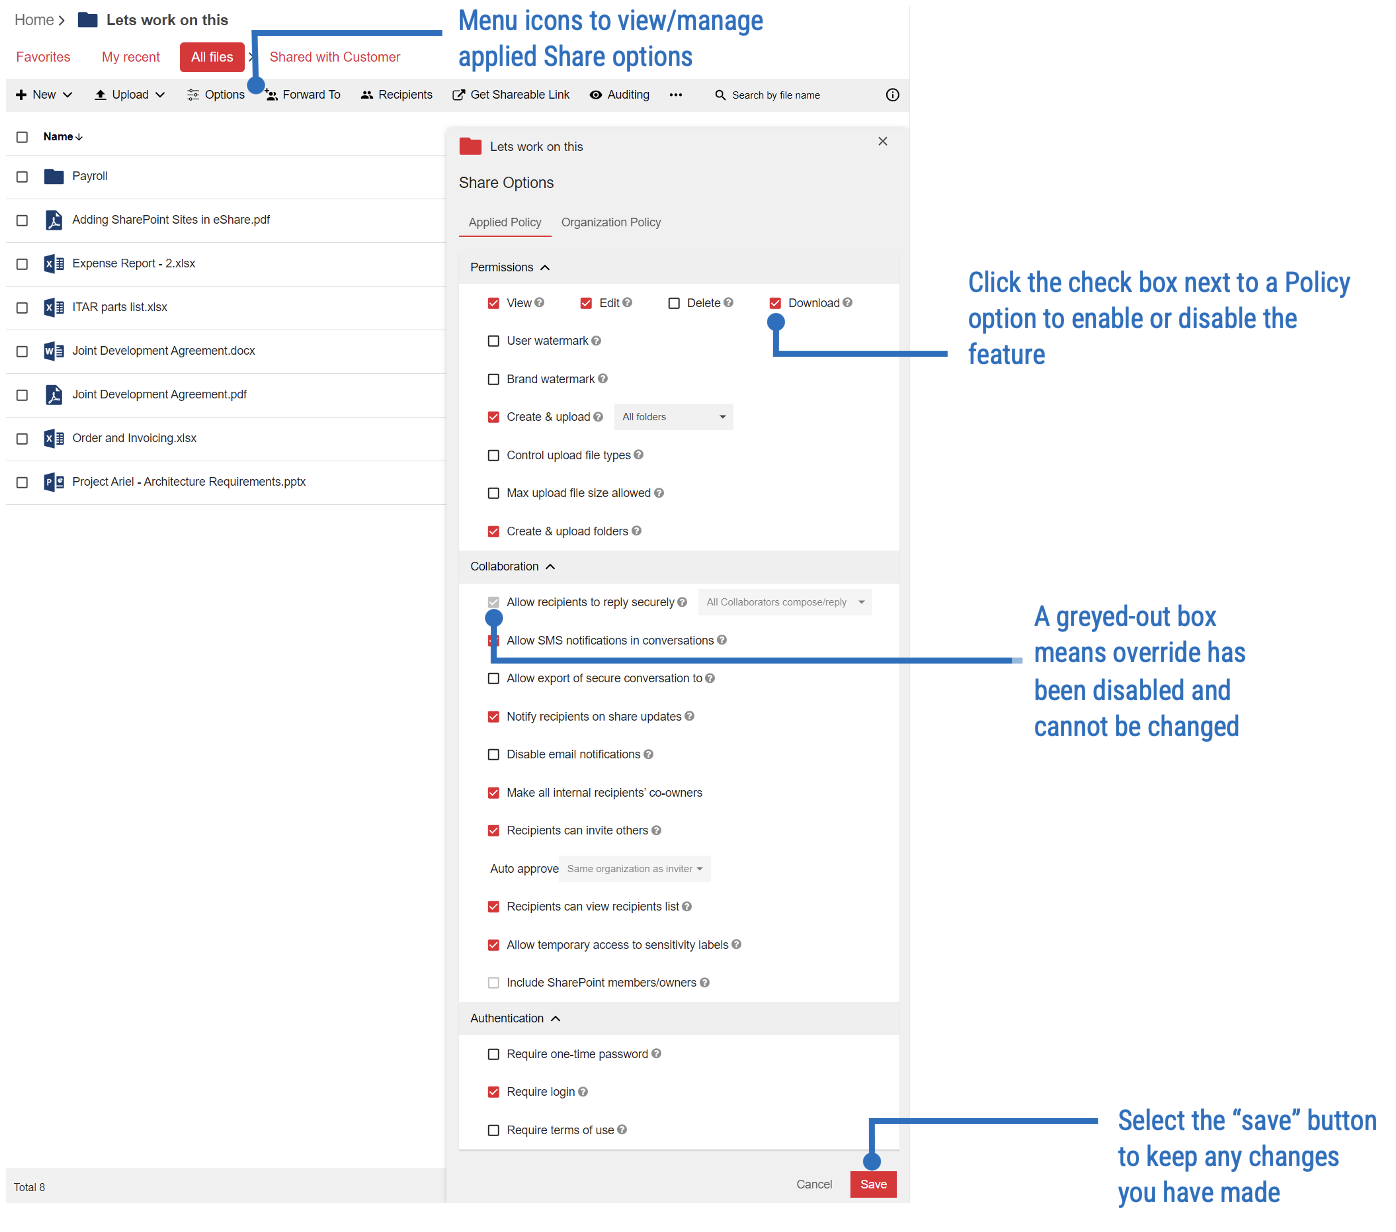
Select a Trusted Share followed by “Options” menu in top ribbon to manage the sharing policy options or select “Recipients to view, add, disable recipients of the share.
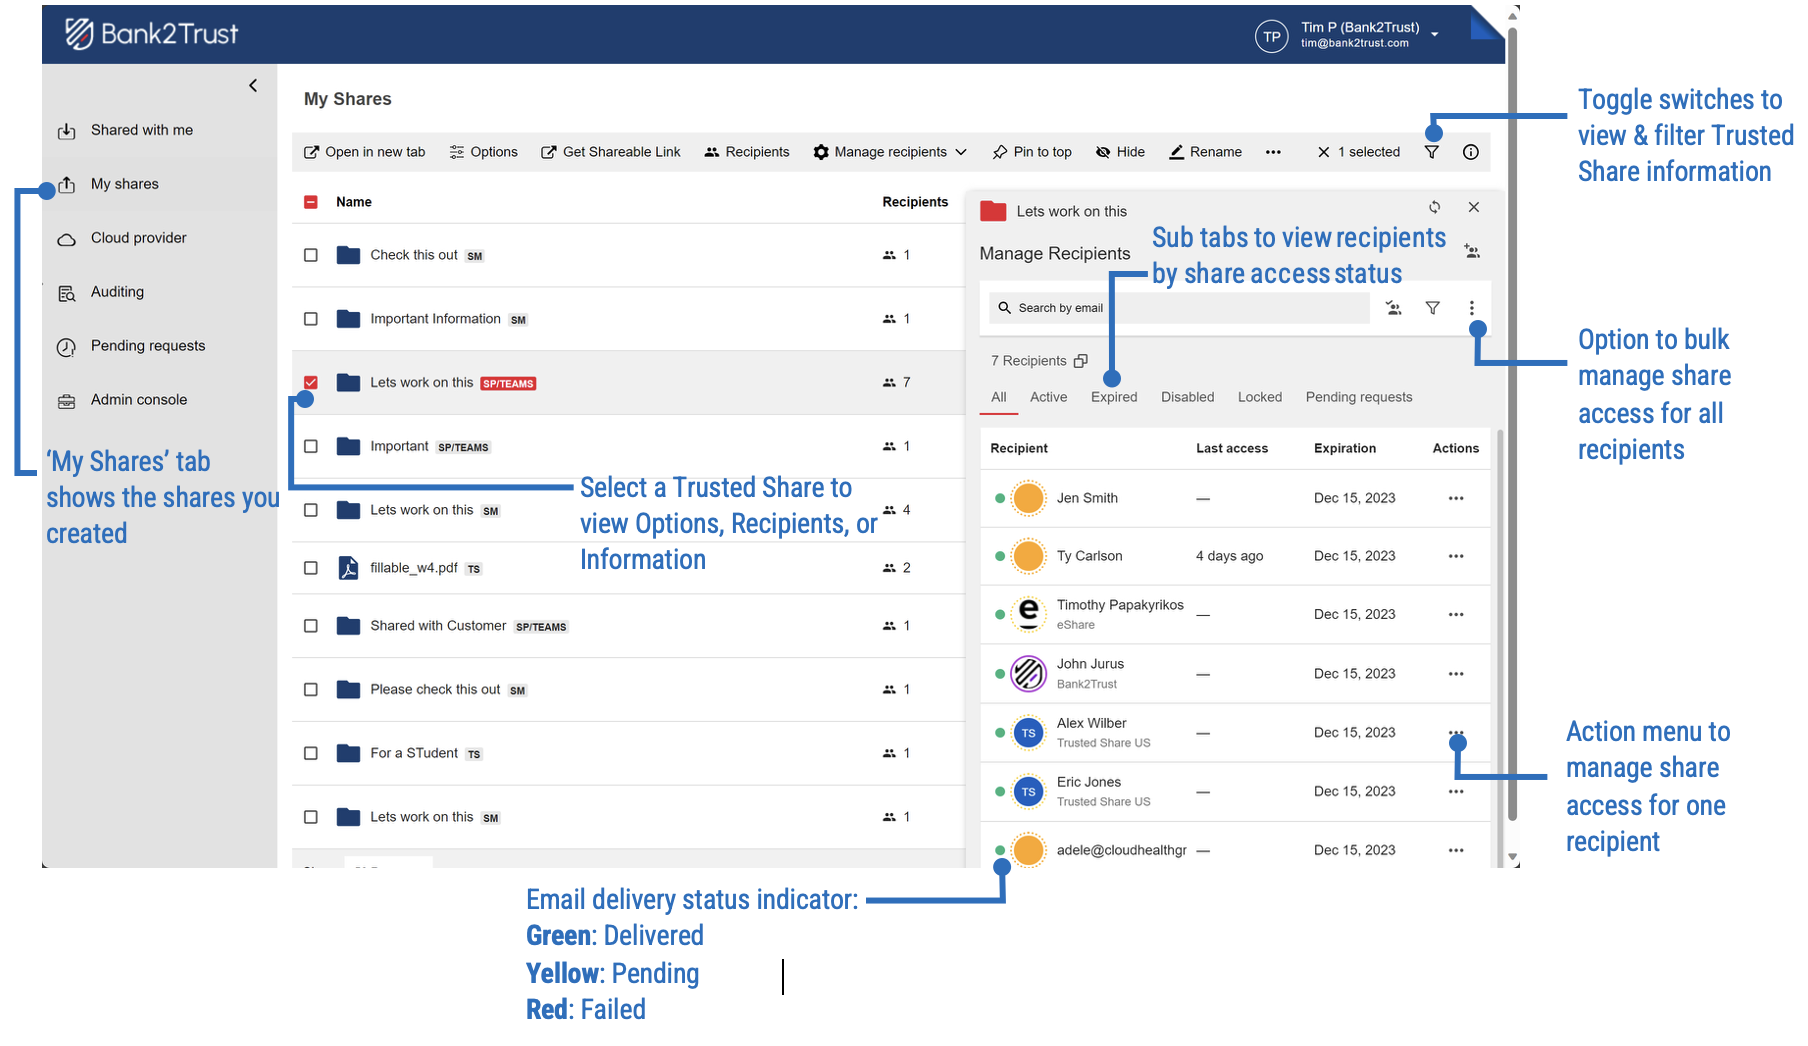
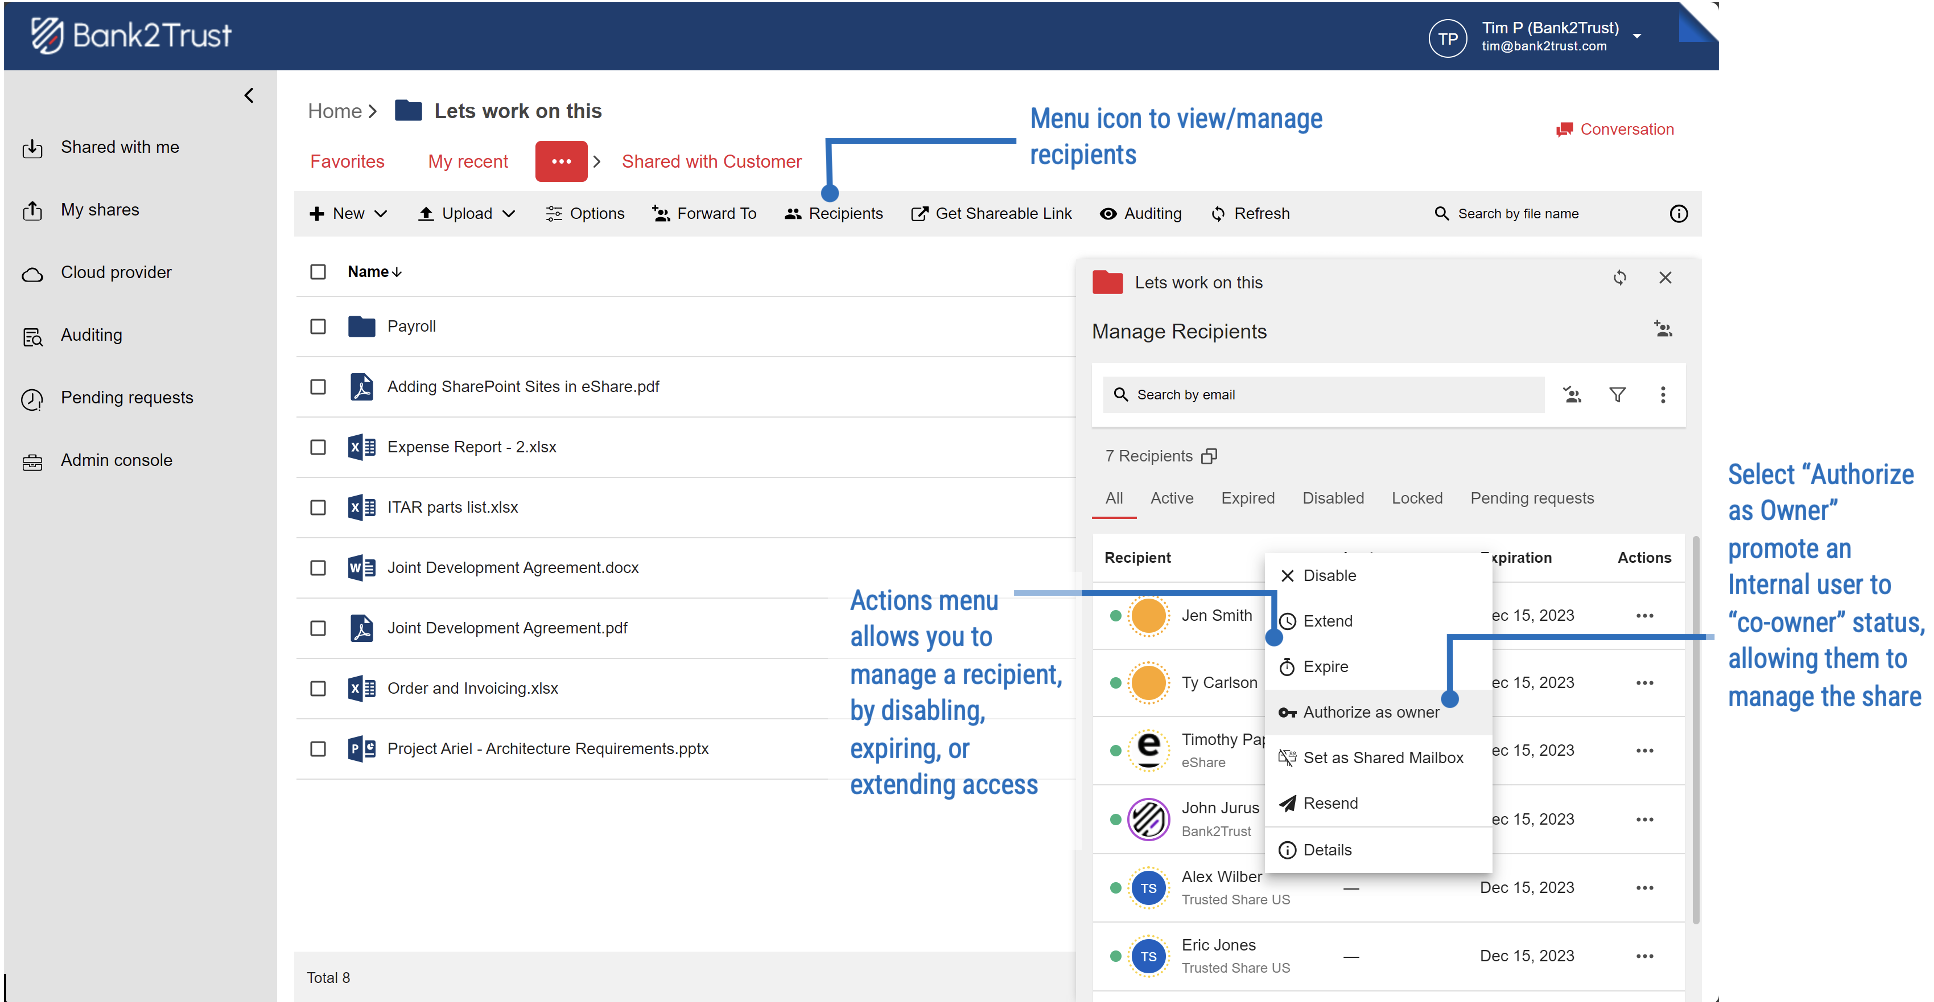
Manage Recipients actions
You can perform these actions to one user or to multiple users.
Disable – Select this option at share level to disable access for all recipients. Access can also be disabled for individual recipients of the Trusted Share without affecting access for other recipients
Extend – This option provides you the ability to change the expiration date of the share
Expire – This option provides you the ability to expedite the expiration of a share
Authorize as owner – Promote an internal member to co-owner status
Resend – Resend email notification of the Trusted Share to all recipients or to the selected recipient
Add Recipients – Add new recipients to an existing Trusted Share
Manage Trusted Share Options
Both the Applied Policy and Organization Policy is displayed on separate tabs. You can change any setting that is allowed to override (non-grayed out)
Organization Policy – The Share Policy settings associate with the Share Policy chosen at the time of the trusted share. This can be understood as the original or default settings for the Share Policy.
Applied Policy – The Share Policy that was used for this Trusted Share. It may include any settings the Trusted Share Owner did override.
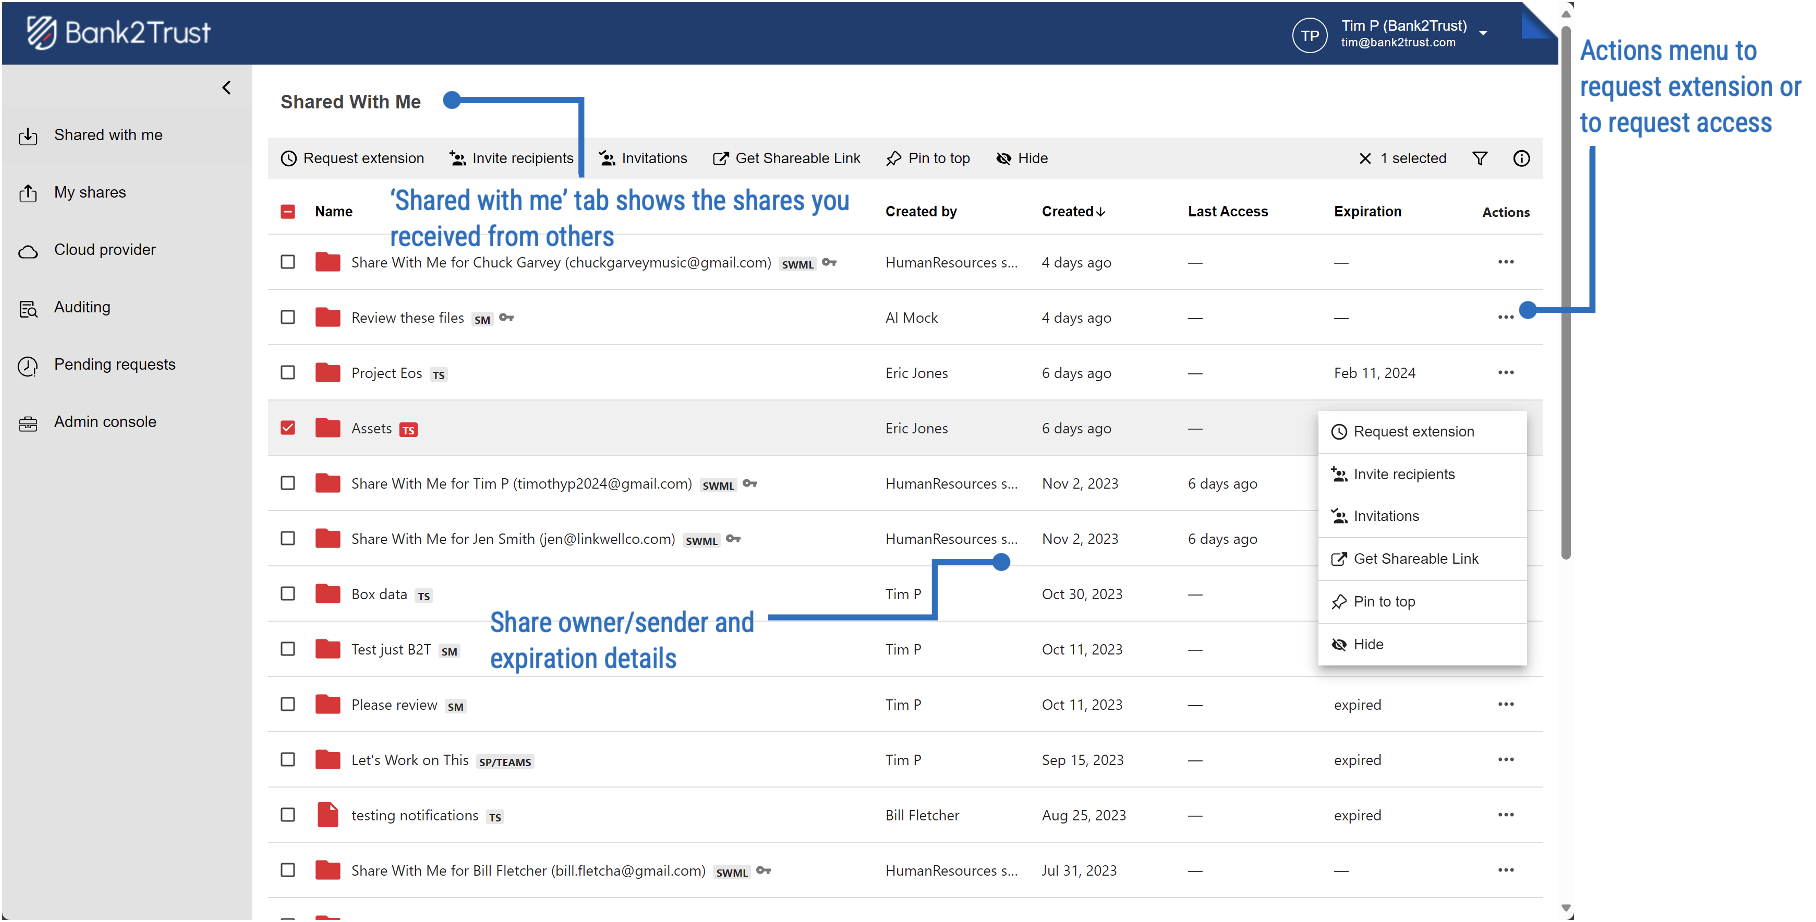
Accessing Trusted Shares You Received
When someone sends you a Trusted Share, you would receive an email notification about it. Clicking on the link to access the share navigates you to the specific share. You may also access the Trusted Share directly from the ‘Shared with me’ tab.
FAQ
What is the purpose of the eShare Quick Start Guide?
The eShare Quick Start Guide provides users with reference materials to quickly get acquainted with using the eShare Web Portal for secure collaboration.
How can I upload files to my cloud storage using eShare?
Files can be uploaded via the ‘File Upload’ option or by using the drag & drop method.
Can I create new Microsoft Office documents in eShare?
Yes, you can create and edit Office 365 files (Word, Excel, PowerPoint) via eShare.
What is a Trusted Share in eShare?
A Trusted Share allows you to securely share files or folders with others, enabling collaboration while managing access and sharing policy settings.
Is it possible to manage the sharing policy options after creating a Trusted Share?
Yes, you can update the Sharing Policy Options after sending a Trusted Share in either the My Shares view or in the Trusted Share Collaboration View.
Can recipients of a Trusted Share invite others?
Yes, but this feature depends on the sharing policy set by the share owner.
What actions can I perform in the Trusted Share View?
As the owner, you can manage access, reply securely, create folders, attach files, and edit shared files, depending on the sharing policy.
How do I access Trusted Shares that I received?
You can access Trusted Shares through the email notification link or directly from the ‘Shared with me’ tab in eShare.
Are there any limitations on file types or sizes for uploads?
Yes, you can set limitations on upload file types and maximum file sizes when creating a Trusted Share.